Rated 5.0/5.0 by 1 user
Share this post
Litematica Mod
Copy and paste builds between different worlds, share builds as files with your friends. Project holograms to make building complex contraptions feel like a breeze!


The main idea behind the Litematica mod is to copy builds, save them as schematics and share them. The shared schematics can then be used by other players to copy the build into their world. The schematic can also be used to generate a holographic view of the build, which will assist the player with building the build in survival mode.
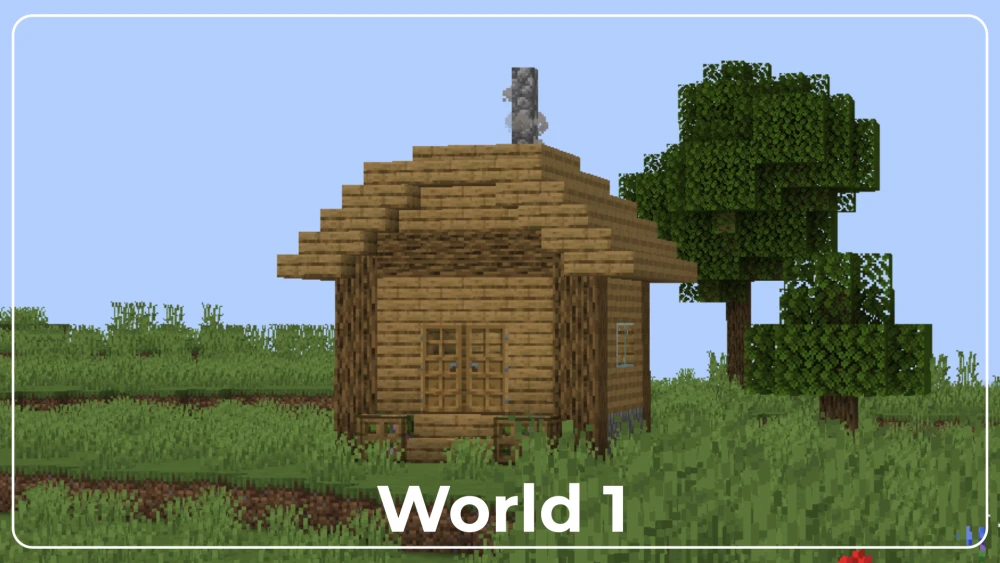
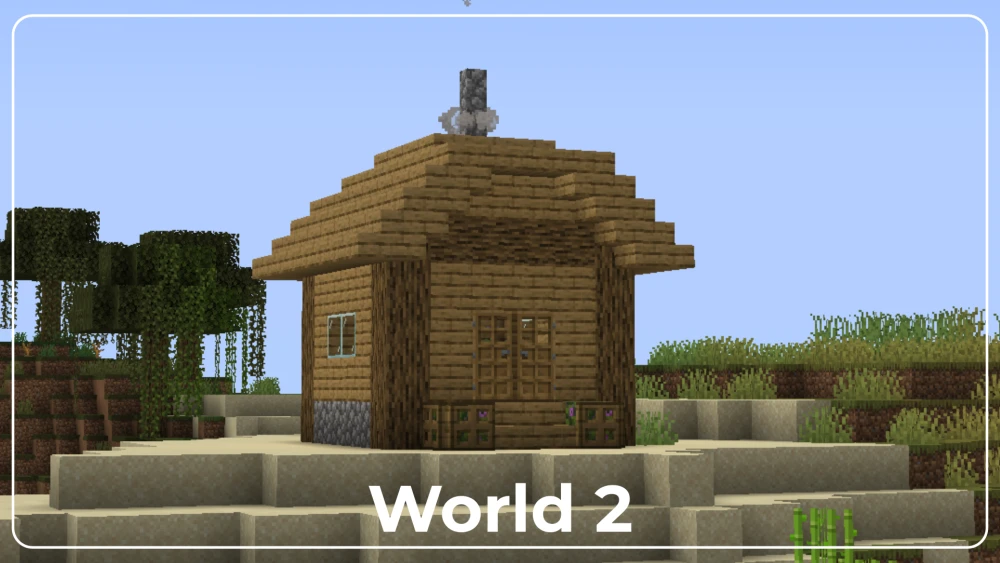
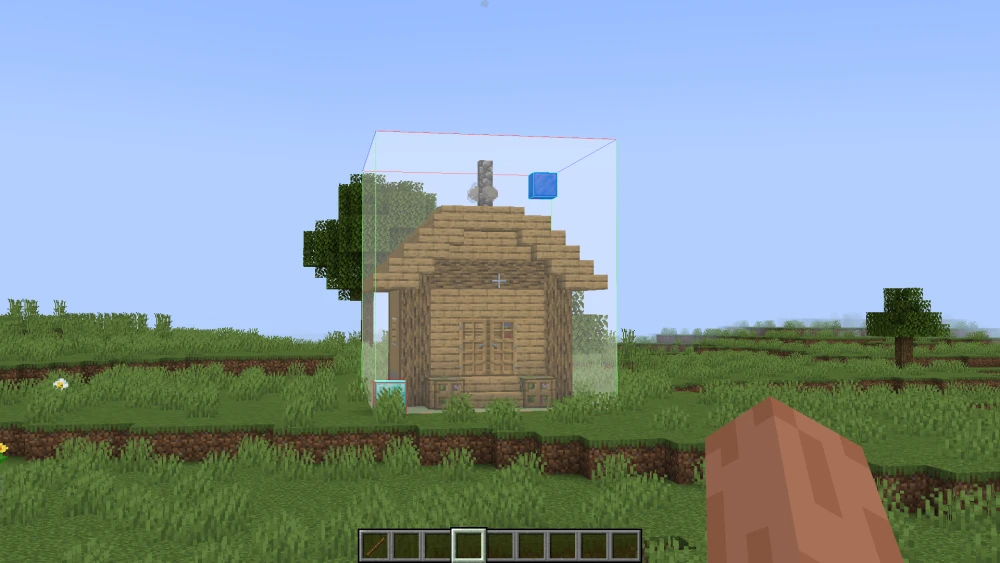
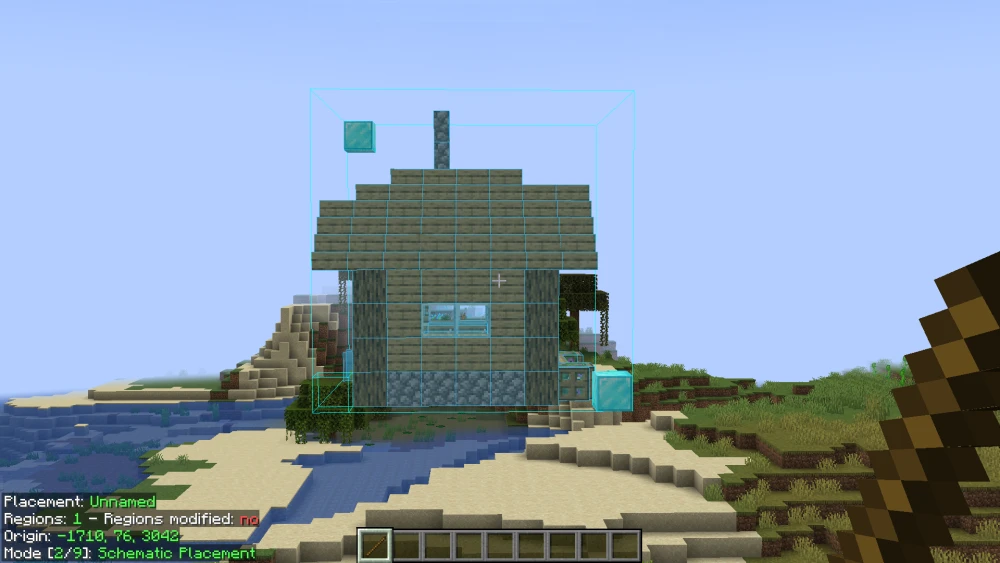
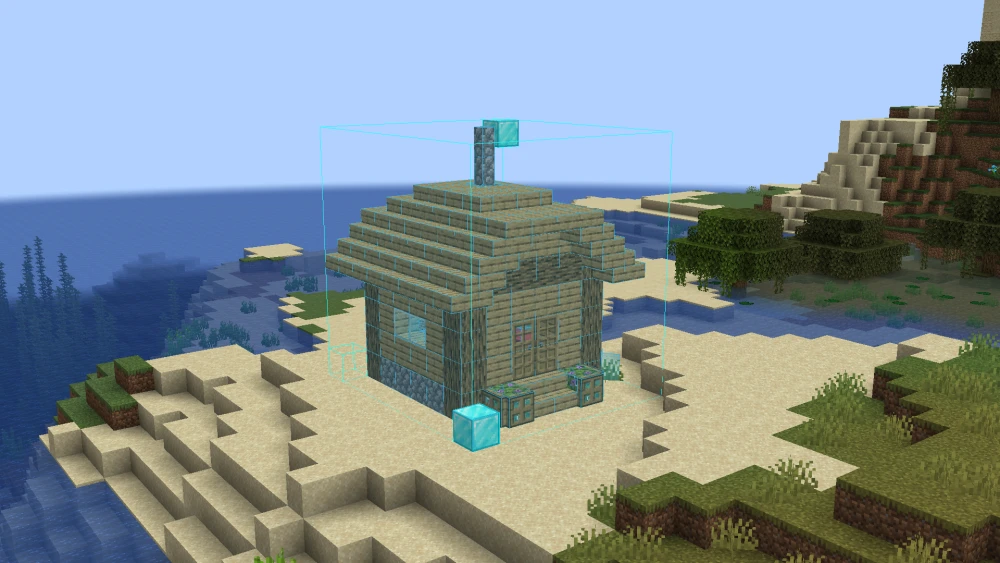
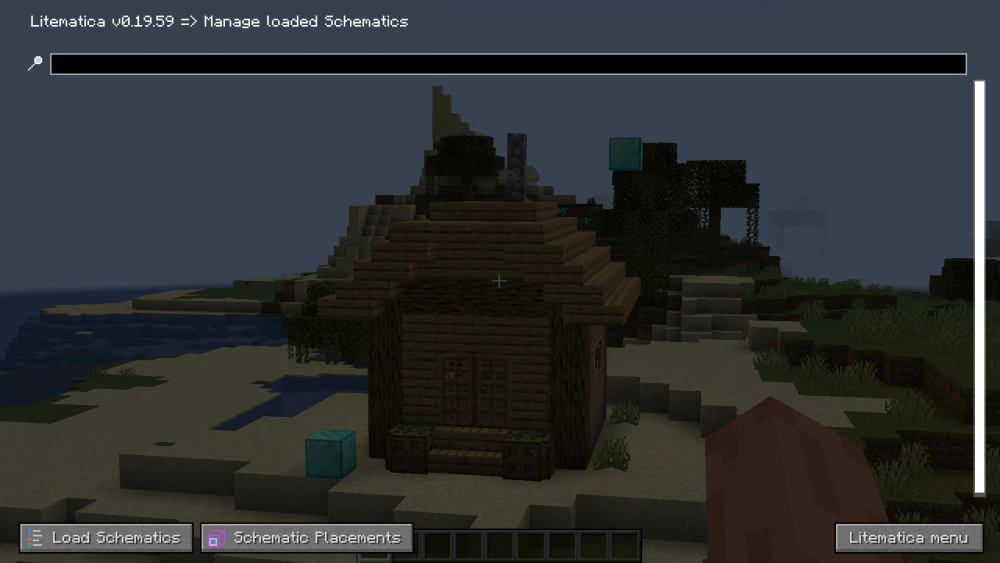
Let us now learn some of the basic features/operations of the Litematica mod using a simple example. In this guide, we will copy the build shown in the image below, which was originally built in World 1, to another world, named World 2.
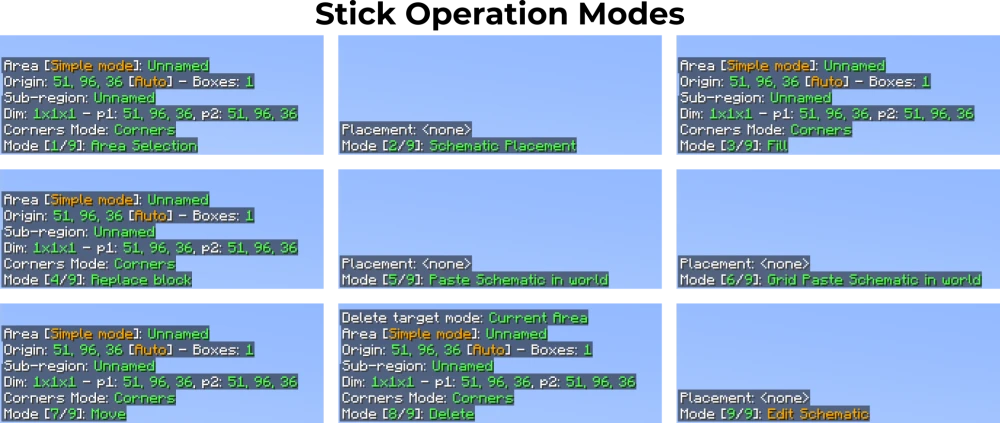
How to use the Stick?
The main tool used for performing different operations in the Litematica mod is a simple wooden stick. Hold a stick in your hand, press and hold down the ctrl key, and scroll the mouse wheel to cycle through the various operation modes available. A total of nine operation modes are available and you have choose the correct one to perform the required operation.
How to Select an Area?
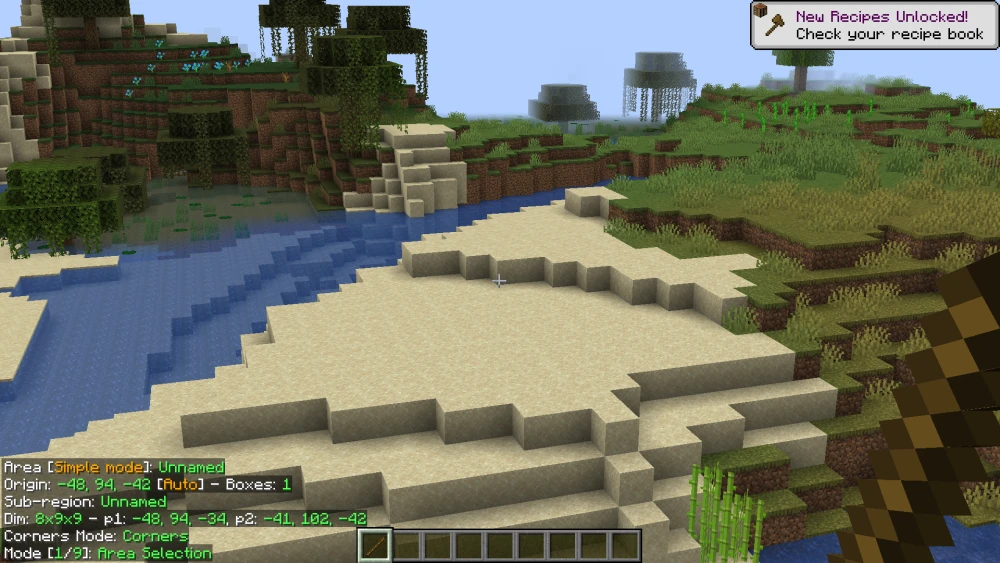
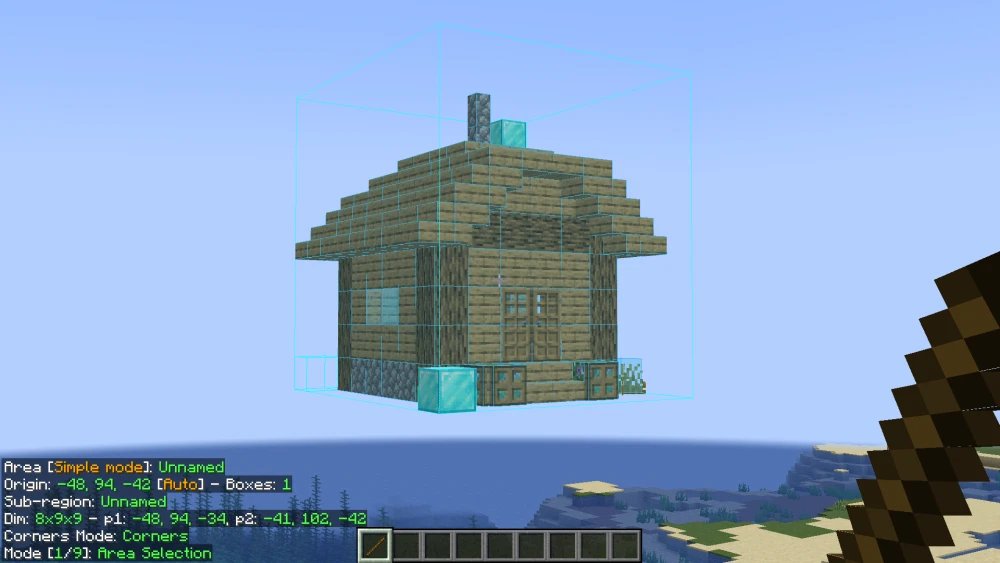
The first step is to select an area for copying. In our example, we will be selecting the three-dimensional area comprising of our build in World 1. For this, you first have to hold a stick in your hand and set it to Mode [1/9]: Area Selection.
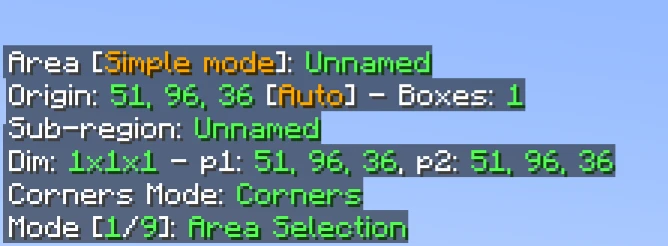
Now you can left-click on a block to set it as position 1 and left-click to set position 2. These blocks will be at two opposite corners of the area you are trying to select. Your goal here is to set position 1 and position 2 in such a way that the entire build is selected without any of the blocks hanging out.
To do this, you can make use of additional blocks to help set the positions. In the example given here, diamond blocks are strategically used to set position 1 and position 2, so that no part of the build is outside the selection area.
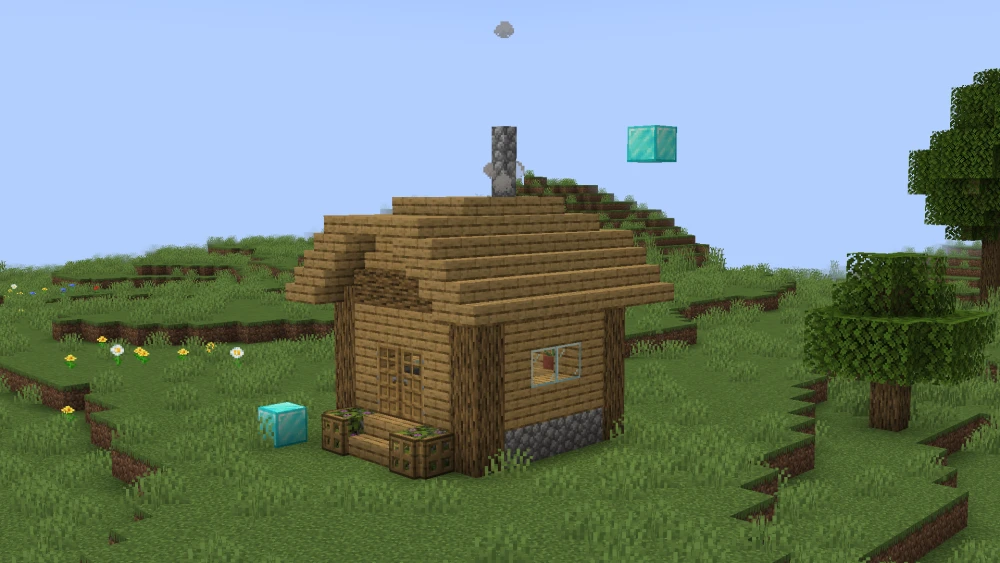
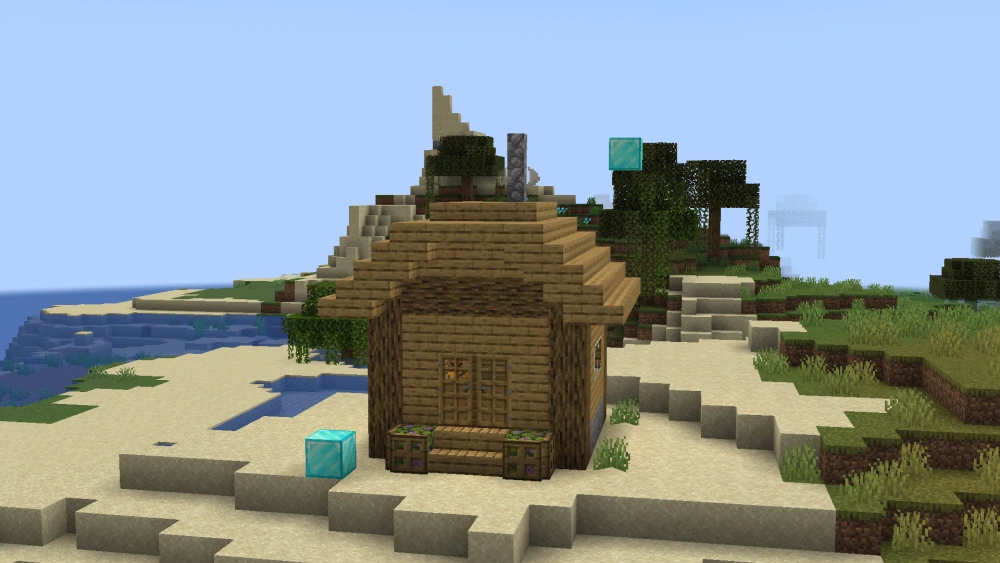
This is the build to be copied. Diamond blocks are placed at two farthest corners to assist with proper area selection.
Left-click on one of the corner blocks to set its coordinates as position 1.

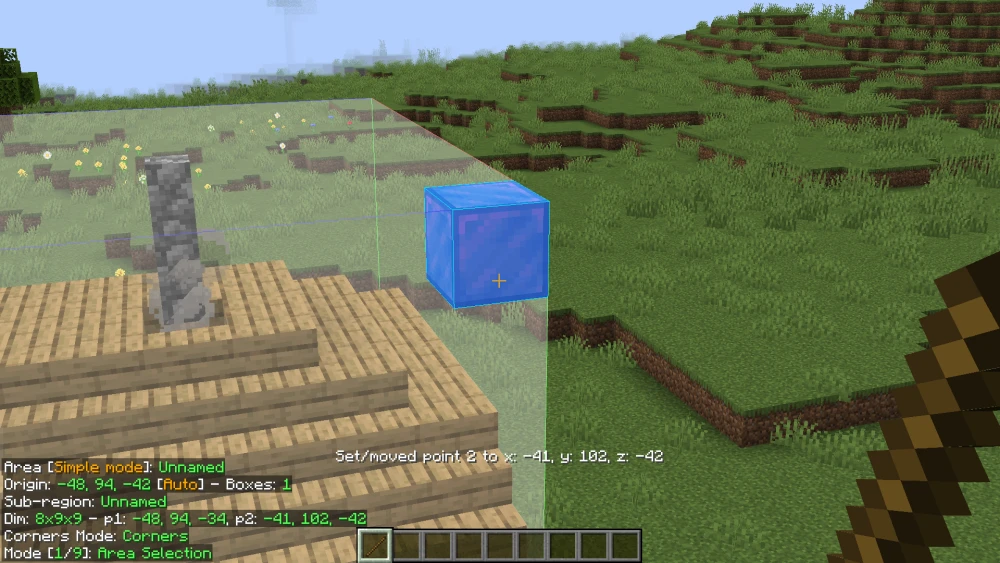
Move to the opposite corner block and right-click to set position 2.
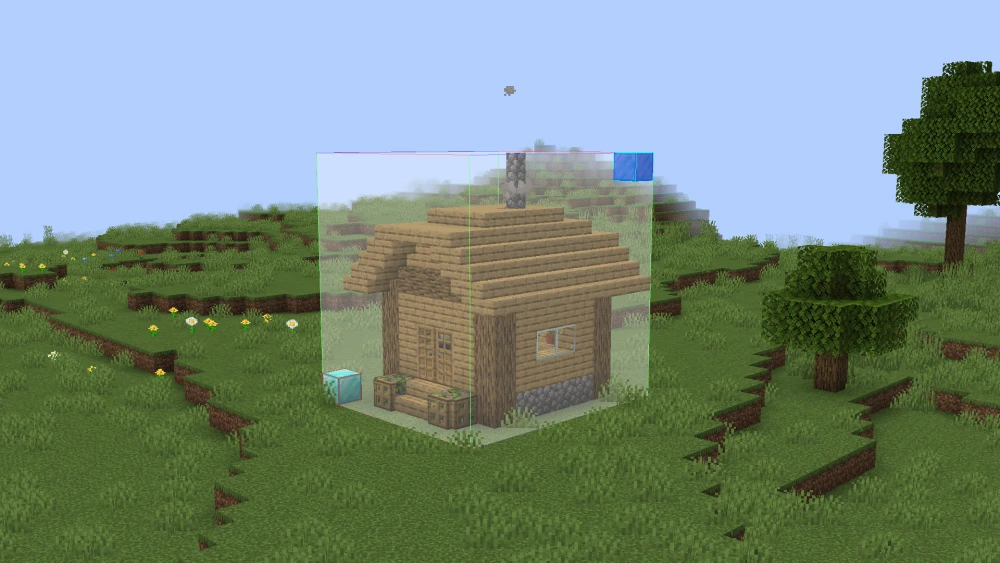
If everything is done correctly, a bounding box completely including the build must appear. This is the selected area.
How to Save a Schematic?
Once you have selected the required area, the next step is to save the selection. Areas selected using the Litematica mod are saved as schematic files. Let us take a look at how you can save a schematic using the Litematica mod.
Make sure your area selection is accurate and all required parts of the build are included within the bounding box of the area selection.
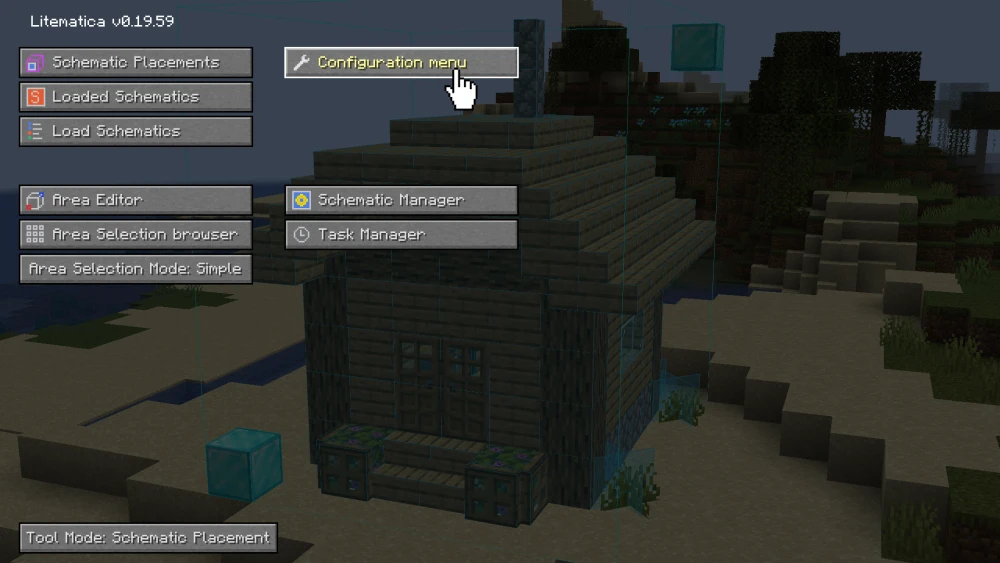
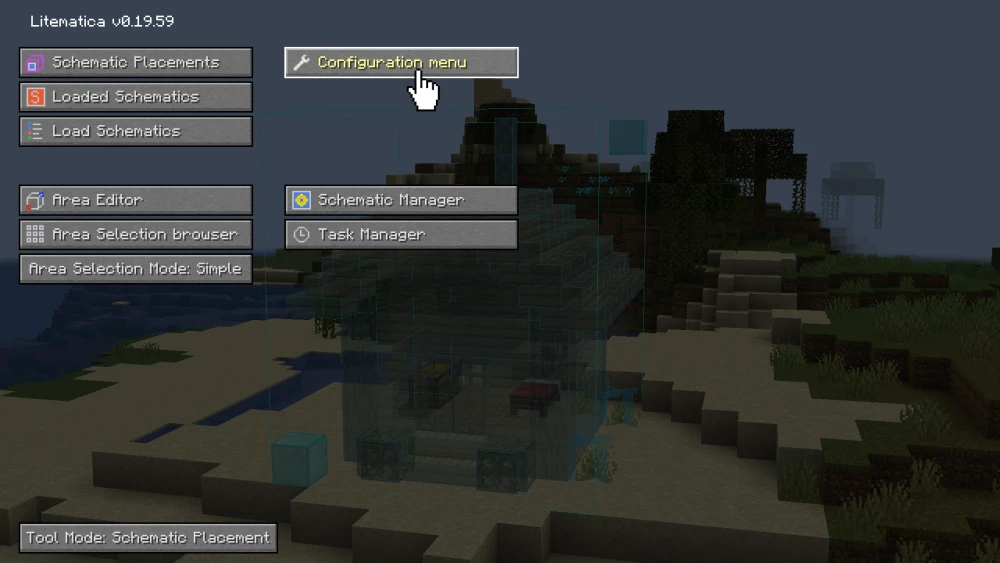
Press the M key to open Litematica settings. From here, click on the Area Editor button.
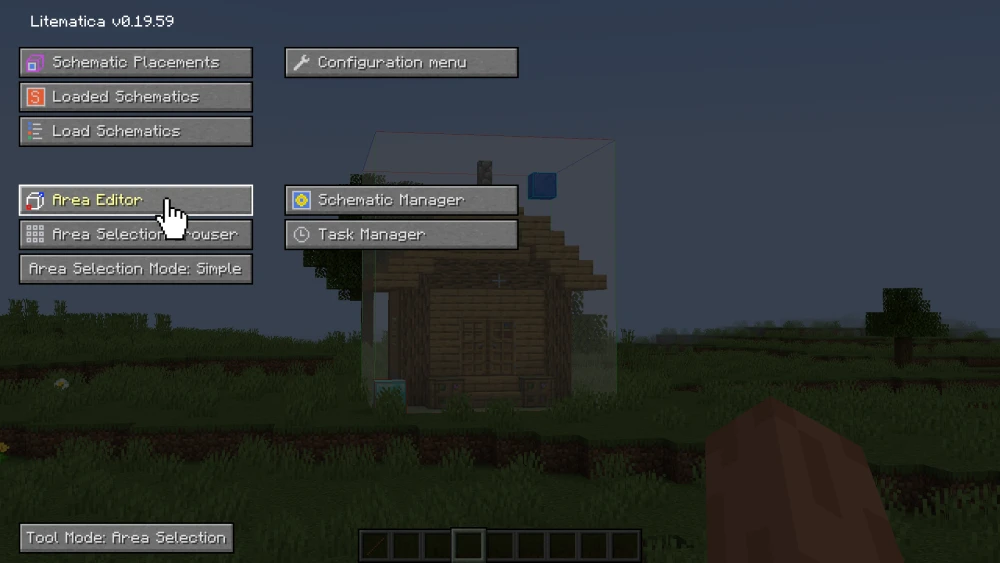
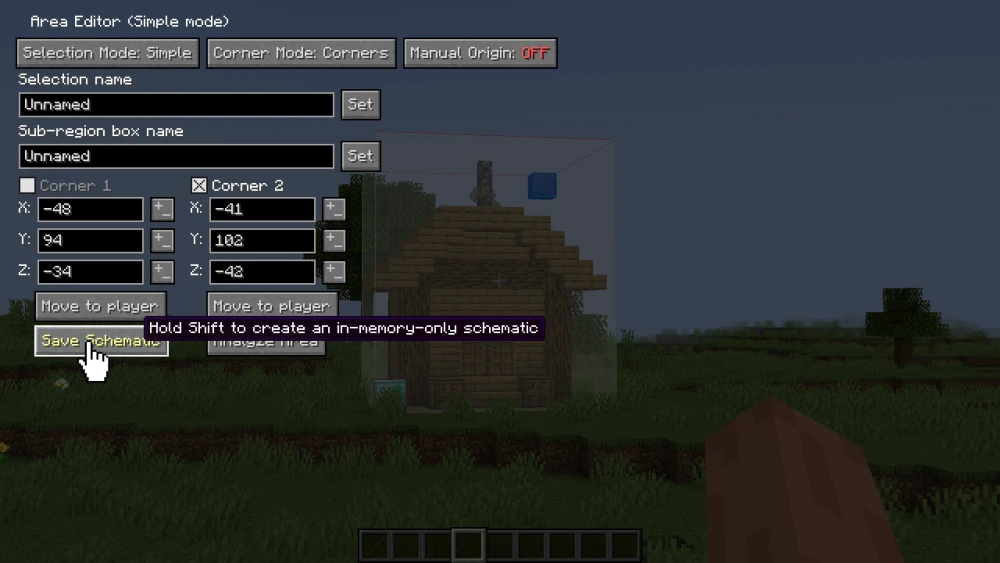
The Area Editor screen includes details about your selected area. If the area you have chosen is accurate, do not change any values. Simply press on the Save Schematic button.
The screen that appears will prompt you to enter a name for your area selection. Give an appropriate name and press on the Save Schematic button.
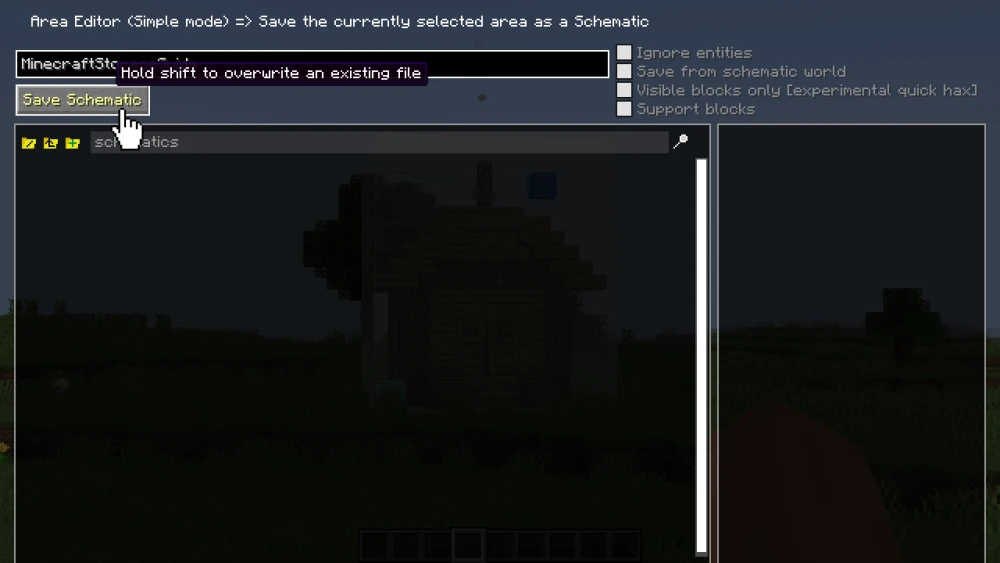
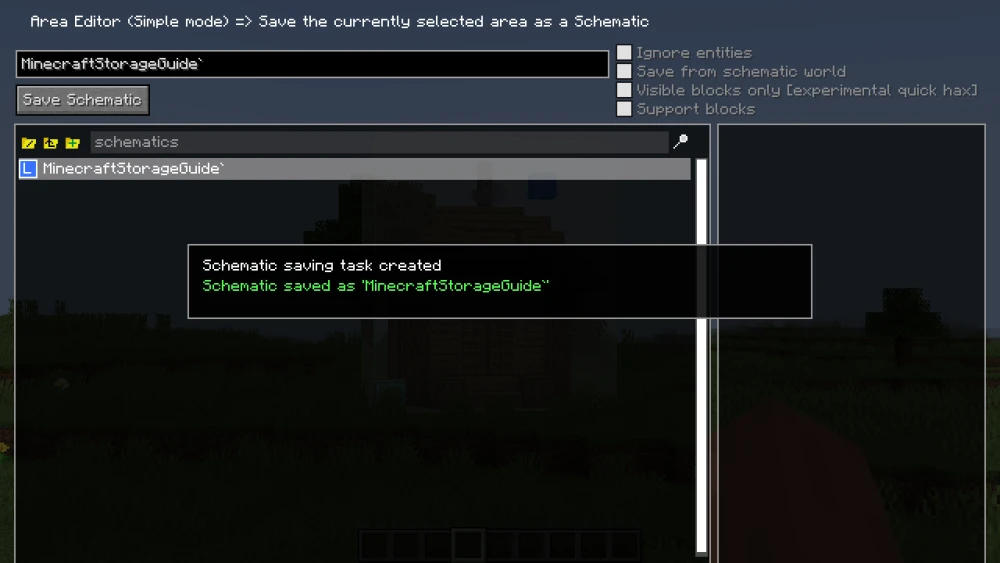
If done correctly, a textbox will appear confirming the saving. You can now press the esc key until Litematica settings are closed to return to your game.
NOTE: The schematic you have saved must now appear as a .litematic file in the .minecraft/schematics folder. You can also add other .litematic files to this folder to import them into your game.
How to Paste a Build?
Let us now take a look at how to paste or import a build using the Litematica mod. The following steps can be applied to import the selected build from the previous steps, or to import any other build. To import another build, you first need to insert its .litematic file into the .minecraft/schematics folder on your PC.
The first step is to choose an area for your build to be placed. This can be in the same world as the first one, or even on an entirely different world.
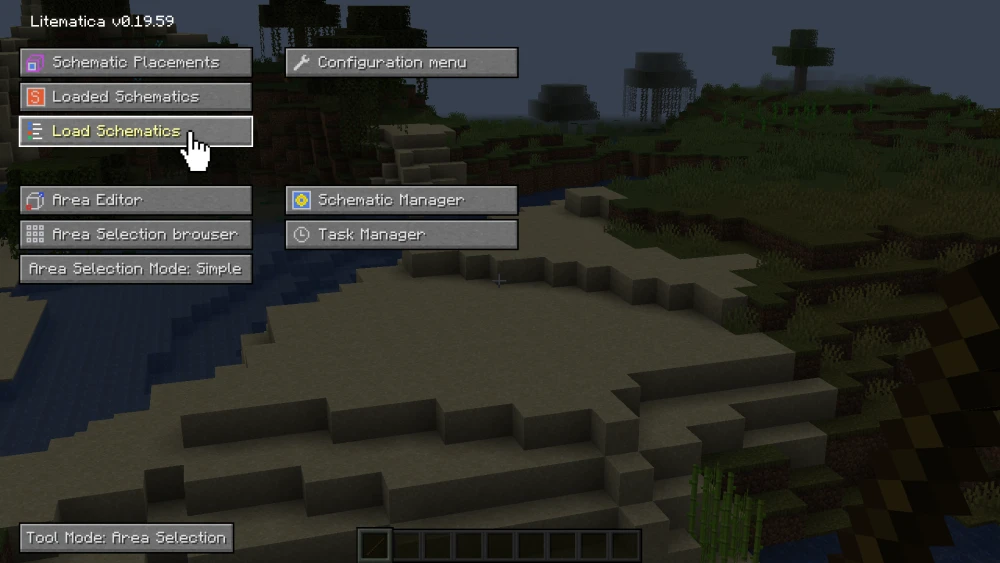
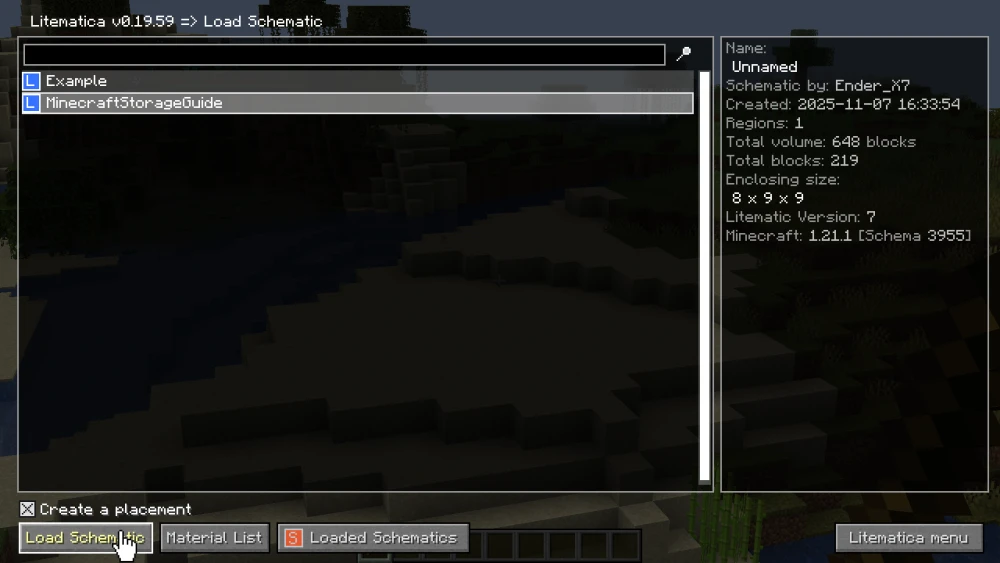
Press M to open Litematica settings. From here, press the Load Schematics button.
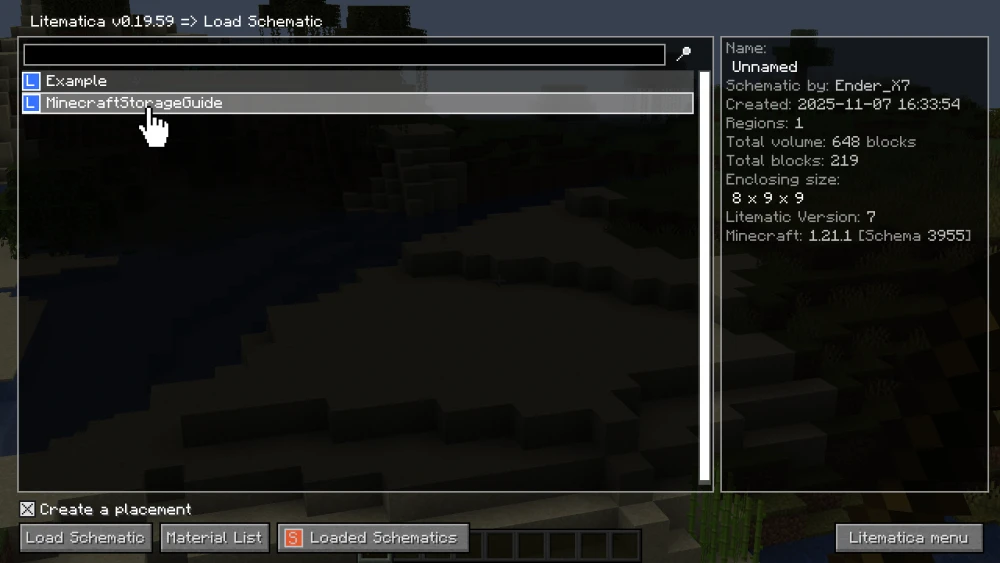
On the next screen, a list of available schematics will be given. Any .litematic file you have imported into the .minecraft/schematics folder will appear here.
Select the build that you want to paste.
After selecting the required build, press the Load Schematic button given at the bottom left corner of the screen.
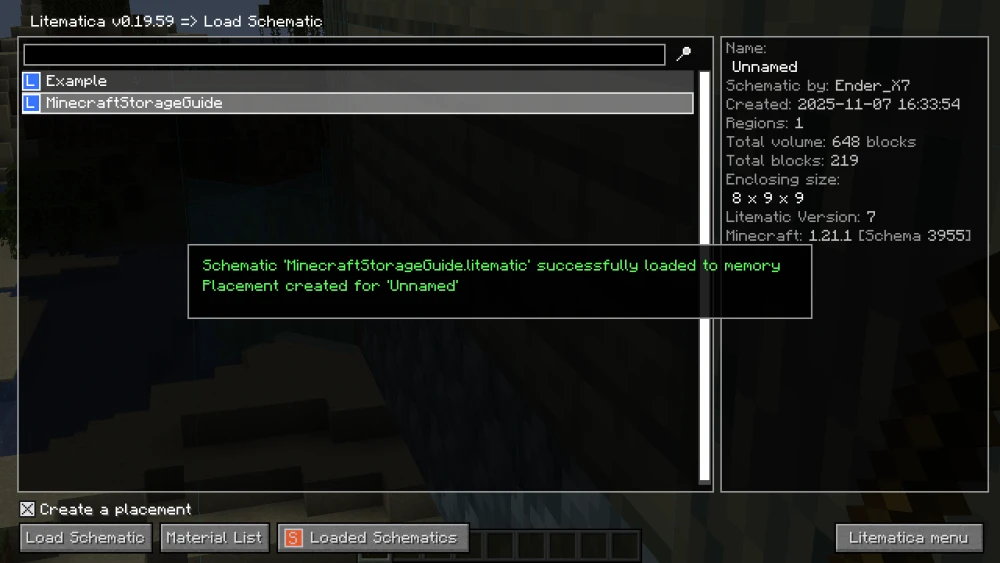
If done correctly, a confirmation must appear saying that the build has been loaded correctly. Press esc key until the settings screen is closed.
The loaded schematic has now appeared in your world.
How to move the Schematic?
Simply loading in the schematic is not not enough. You have to move around the schematic until it is placed accurately at the location of your choice. Follow the steps below to move your schematic to the correct location.
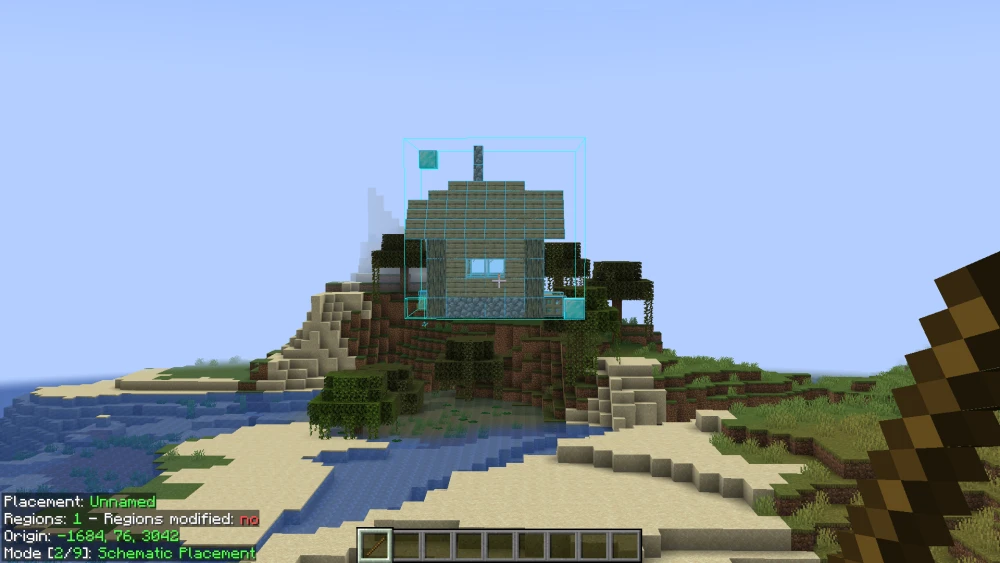
For this, the first step is to hold a stick and set it to Mode [2/9]: Schematic Placement.
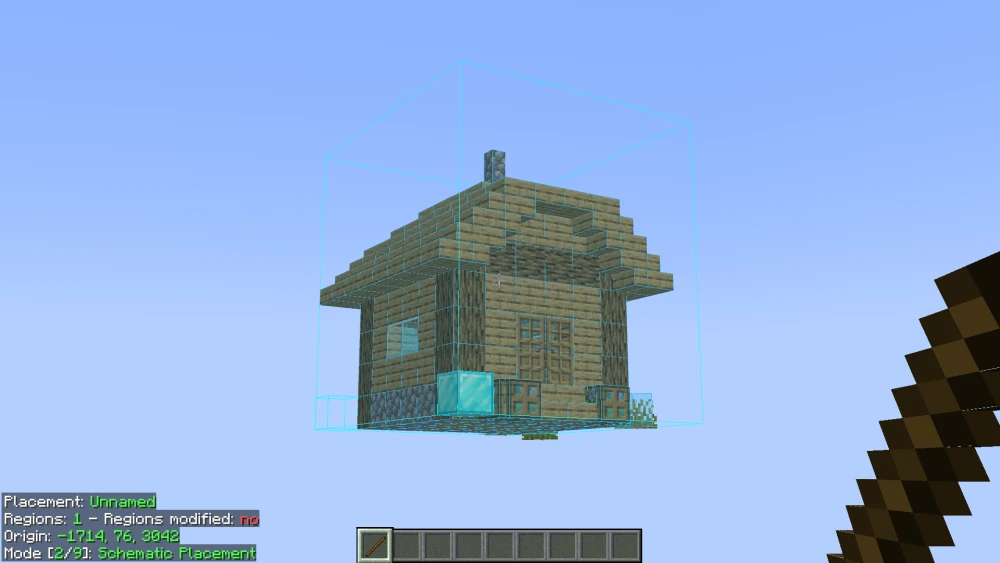
The method of moving your schematic to the desired location is very physical. Follow the steps below to move your schematic to the correct location.
Move to one of the sides of the schematic as shown in the image. You should be holding the stick that is set to Mode [2/9]: Schematic Placement.
Hold down the alt key and scroll the mouse wheel. You should note that the schematic has started moving away from or closer to you.
Holding the alt key and scrolling the mouse wheel forward will cause the loaded schematic to move away from you. Holding the alt key and scrolling the mouse wheel backwards will cause the schematic to move closer to you. This concept is applied to move your schematic across all three axes in the game.
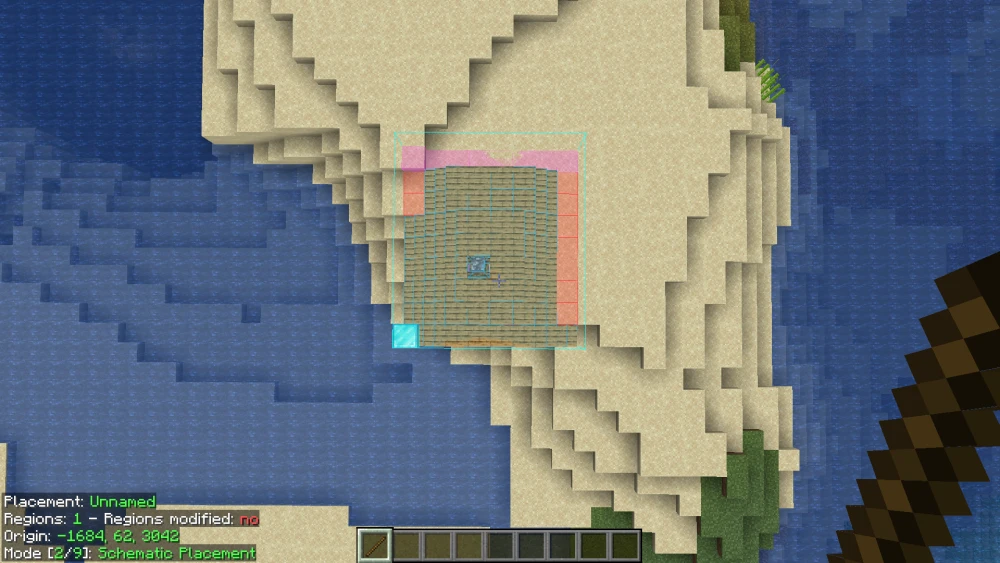
Once the schematic is over your desired area, look from above and use the same method as before to move it away or closer to you.
The red boxes indicate that the schematic collides with blocks on the ground.
The same steps are them performed on the remaining axis to accurately place the schematic.
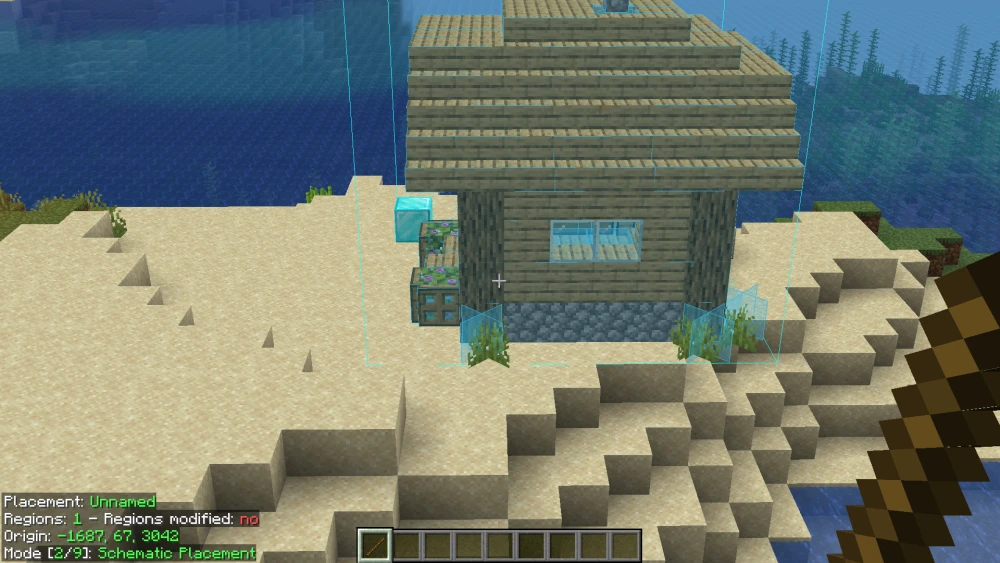
By adjusting the position across all three axes, the schematic has finally been placed at the desired location.
How to Rotate the Schematic?
Adjusting the position of the schematic is not enough. In certain cases, you might want to rotate the schematic to a different orientation. Follow the steps given below to rotate a loaded schematic.
Make sure that you are holding the stick and it is set to Mode [2/9]: Schematic Placement.
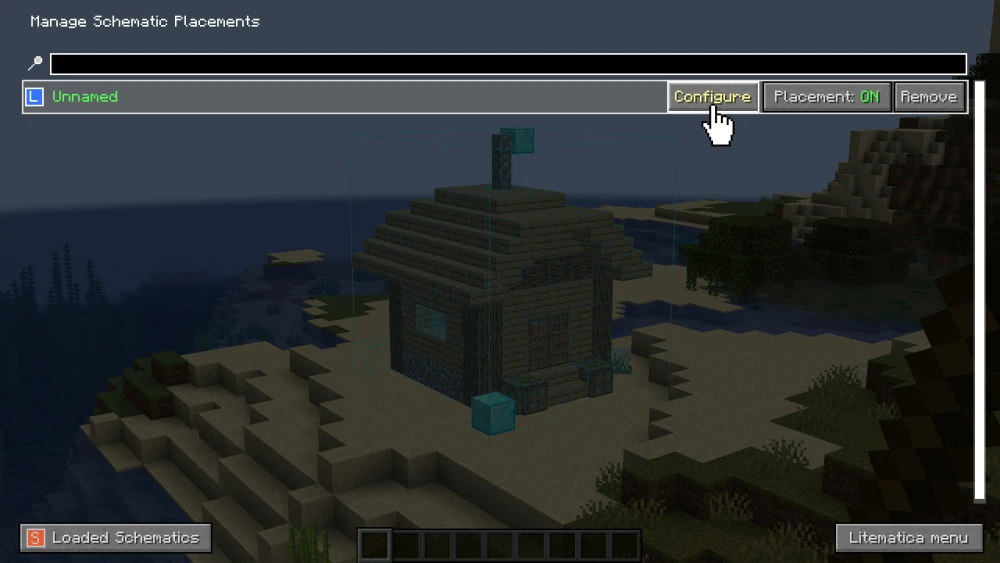
Press M+P to open the Manage Schematic Placements screen.
From here, press on the Configure button given next to your required schematic.
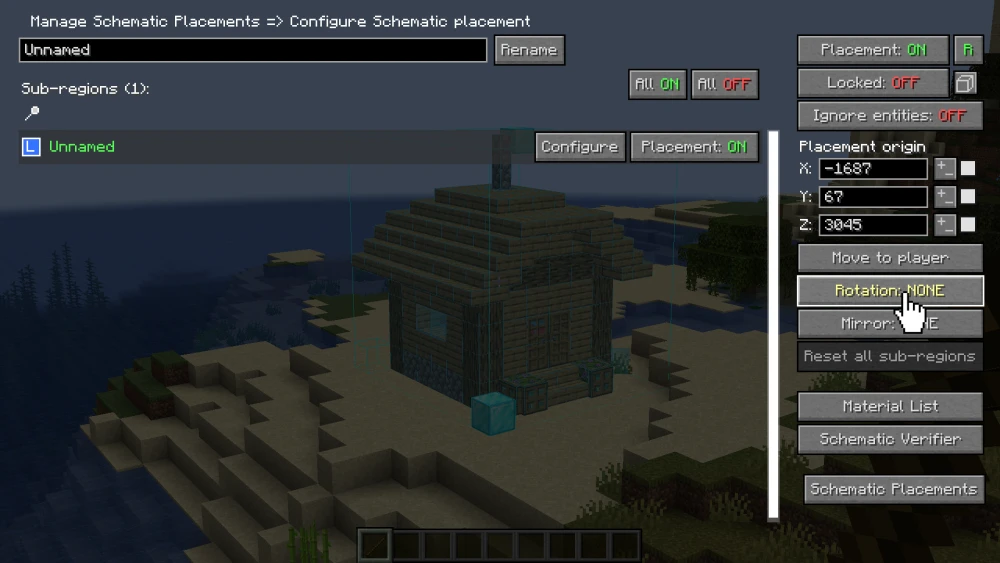
In the screen that appears, click on the Rotation option to rotate your schematic.
Initially, the button will read Rotation: NONE.
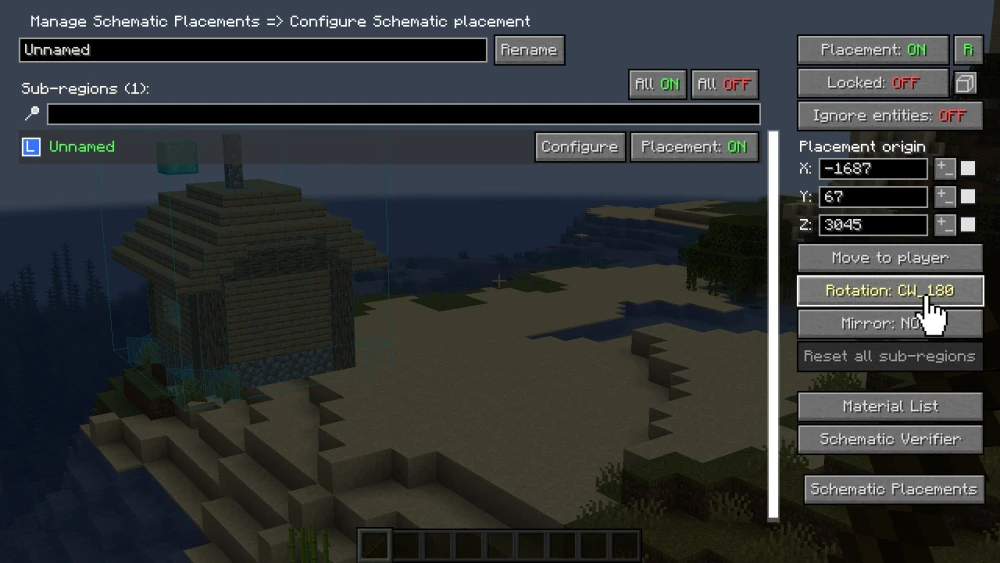
As you click on the Rotation button, you can notice the orientation of the build changing through the translucent background of the settings screen.
The NONE value of the Rotate option will also change accordingly.
Keep clicking to change the Rotation value, until your desired orientation is achieved.
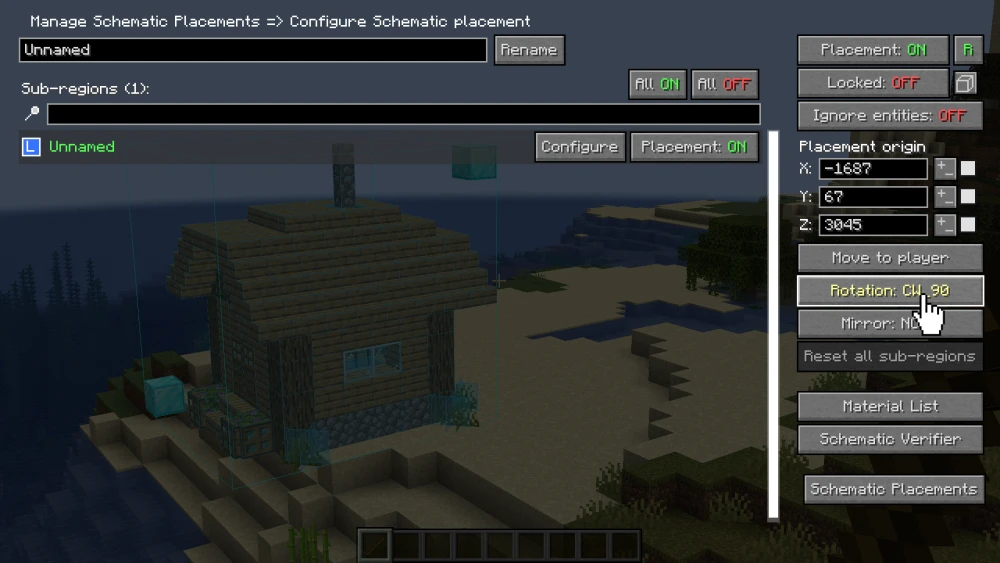
Once done, press the esc key until the settings screen in closed to return to your game.
Changing the orientation might also change the position of the build. Readjust the position accordingly.
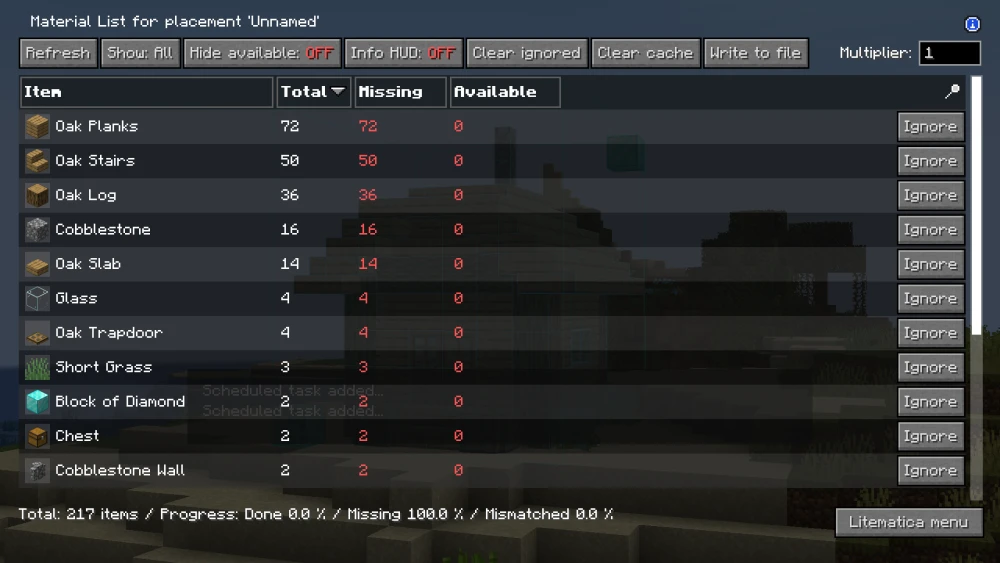
How to View Material List?
One of the perks of the Litematica mod is it's ability to give you a list of materials that are included in the selected area. This basically allows you to know the required amount of individual blocks before you start building.
Simply press M+L to open the material list of the selected schematic.

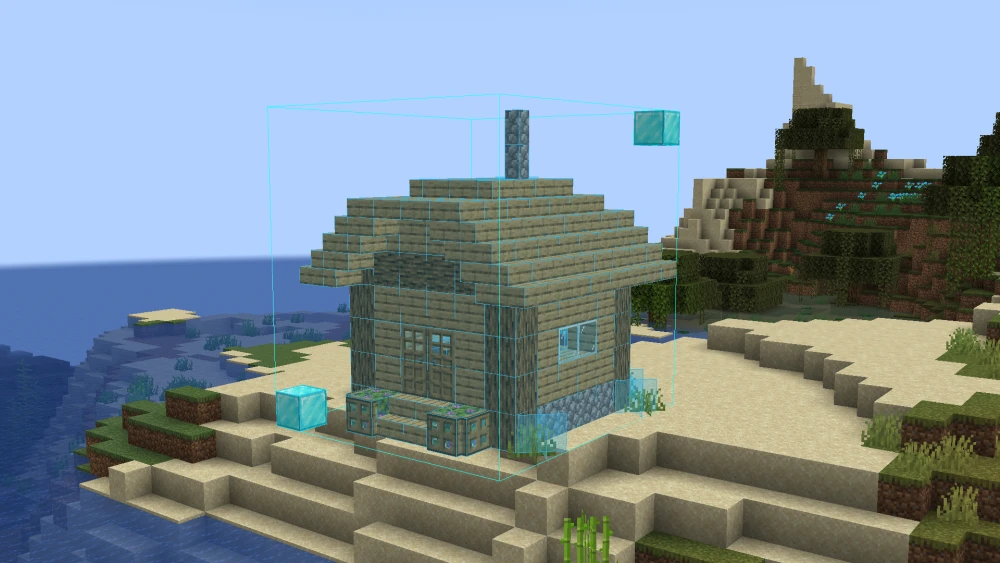
How to make the Schematic Transparent?
By default, any schematic placement created using the Litematica mod is opaque. Obtaining a translucent hologram of the schematic will make it easier for player to build the schematic in survival mode, as it helps with accurate block placement. Follow the steps given below to make your schematic translucent.
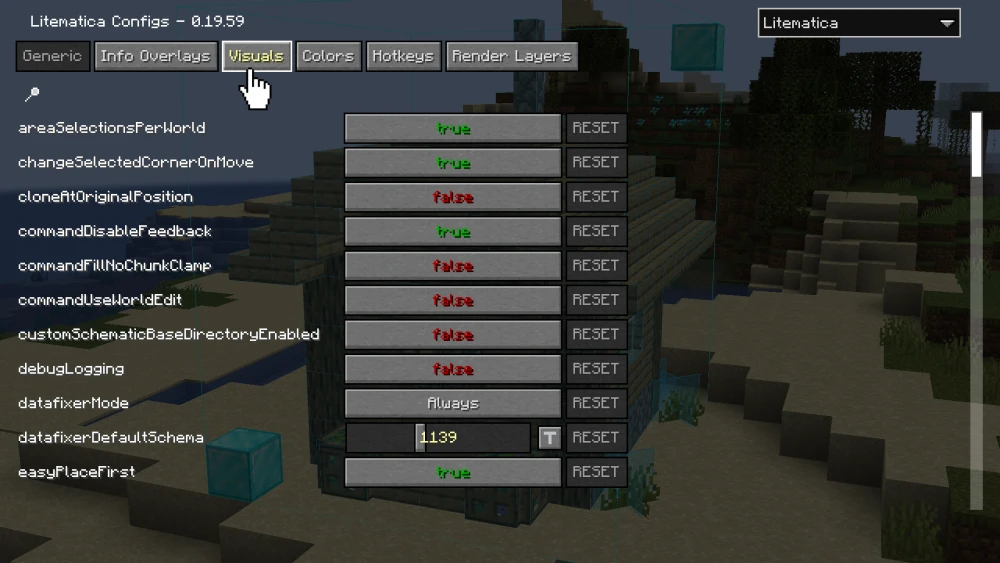
Press M to open Litematics settings.
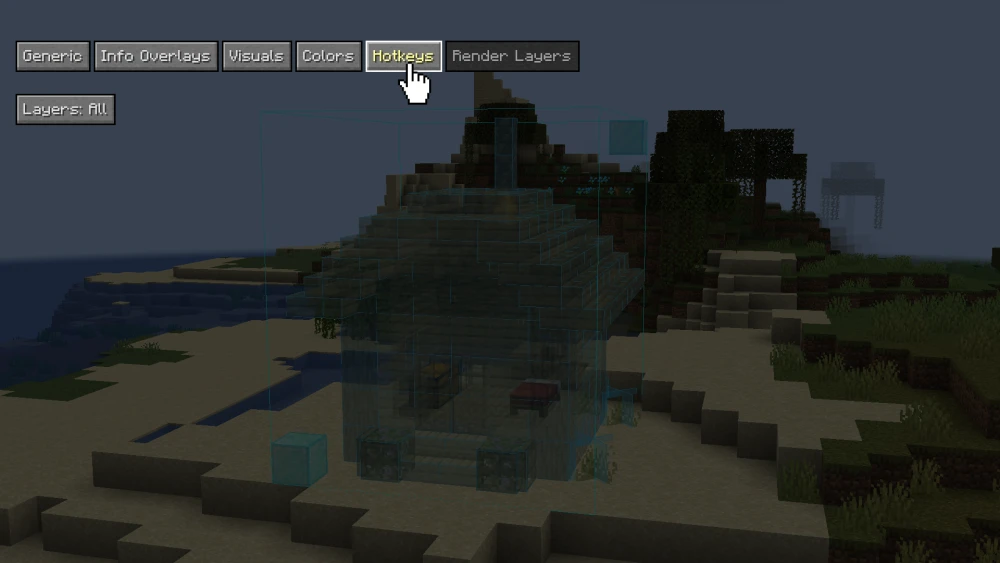
From here, press on the Configuration Menu button.
In the Configuration Menu, head over to the Visuals tab.
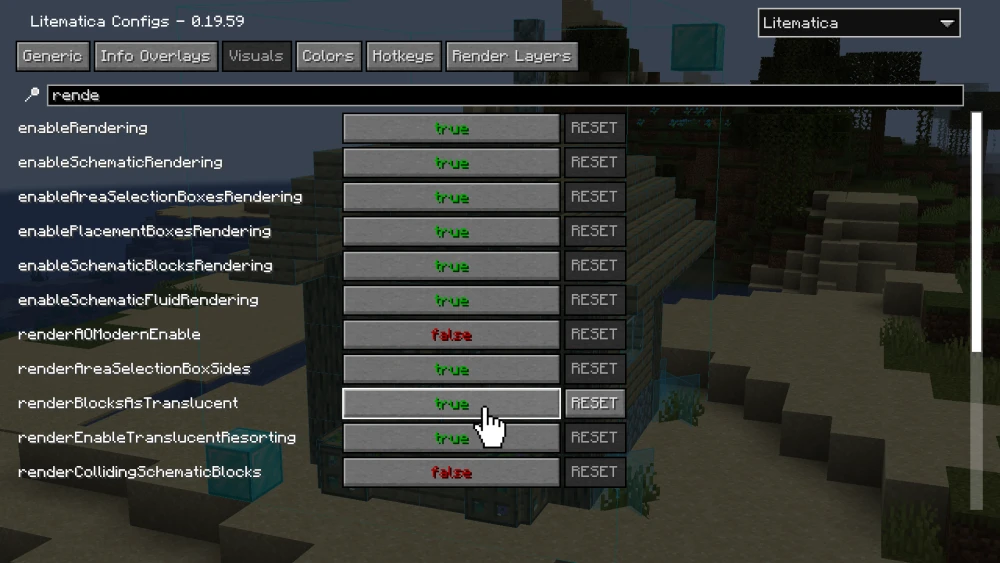
Use the search feature to locate the option that says renderBlocksAsTranslucent.
By default, the value is set to false, click the button to change it to true.
Press esc until the settings are closed.
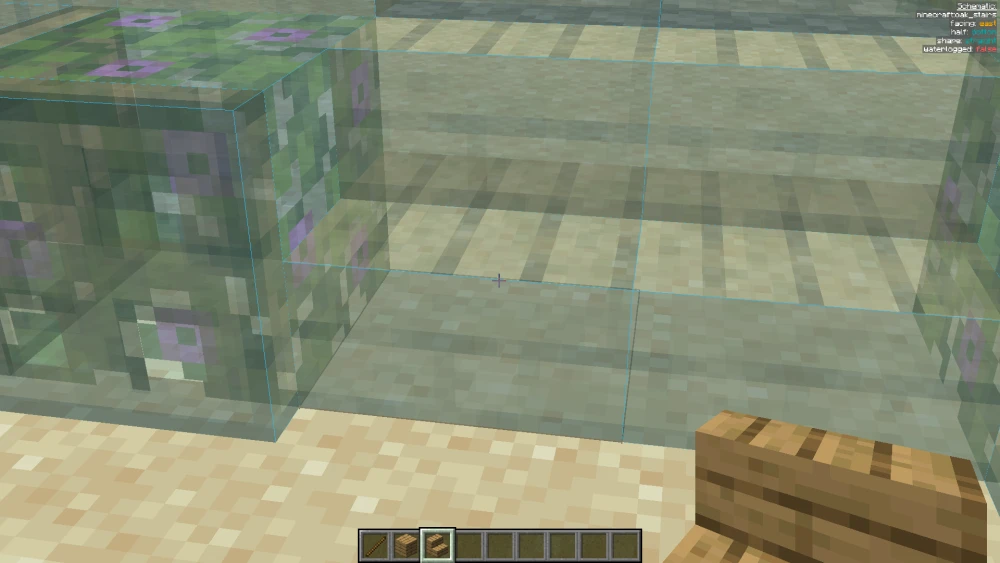
Your schematic must now be translucent.

As mentioned above, the translucent schematic is very helpful when building in survival. As you can see, when the correct block is placed, the schematic for that block turns opaque.

How to Paste a Schematic?
We have learned how to place a schematic. Let us now take a look at how you can paste the entire build using solid blocks. For doing this, you must be in creative mode and must have access to commands.
Press M to open Litematica settings.
From here, press on the Configuration Menu button.
Navigate to the Hotkeys tab.
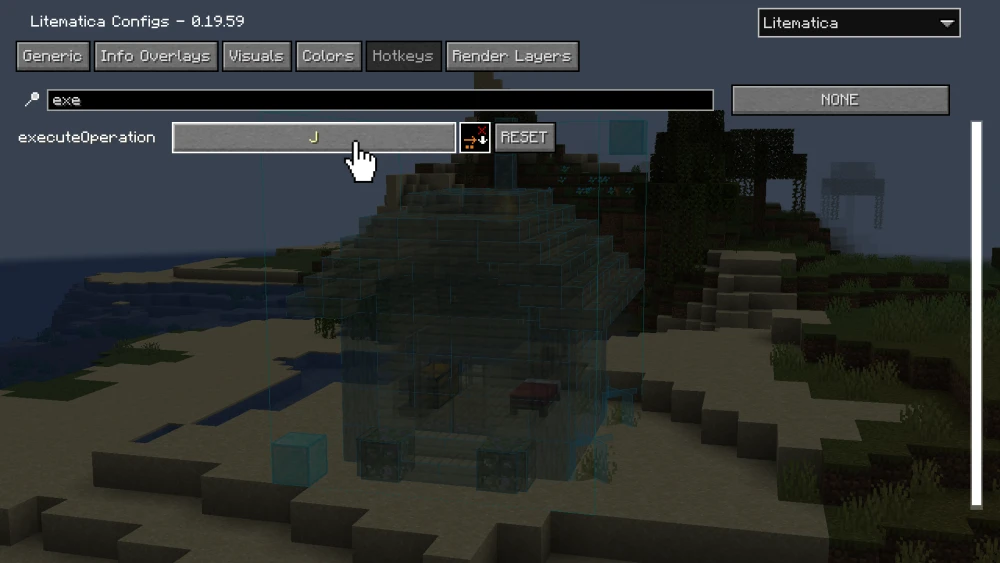
Under the Hotkeys tab, use the search feature to locate the executeOperation command.
By default, no keybind is assigned to this command. You have to assign a keybind yourself.
Press esc until you exit the settings screen and return to your game. Hold a stick and set it to Mode [5/9]: Paste Schematic In World.
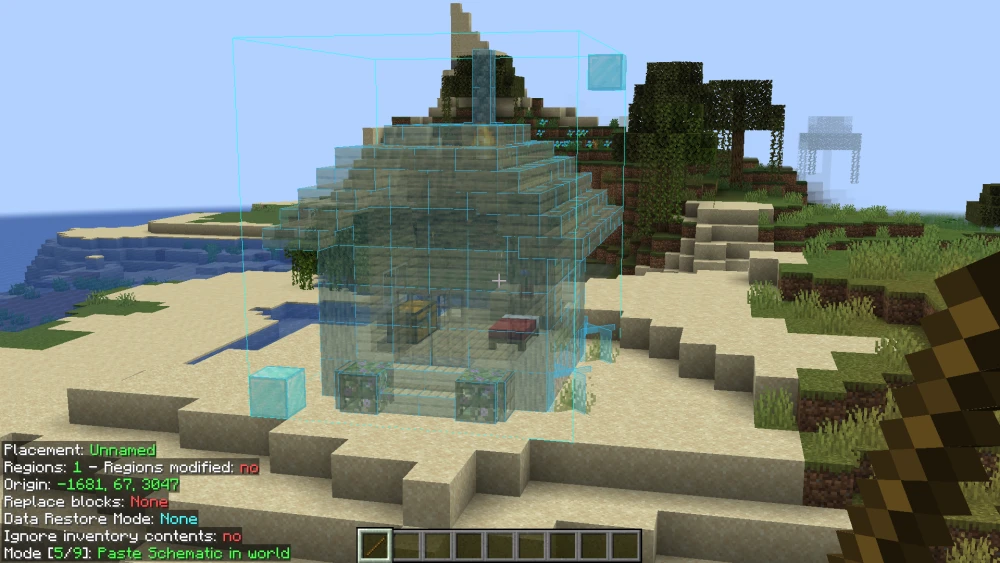
Once the mode is set, press the keybind you earlier assigned to the executeOperation command.
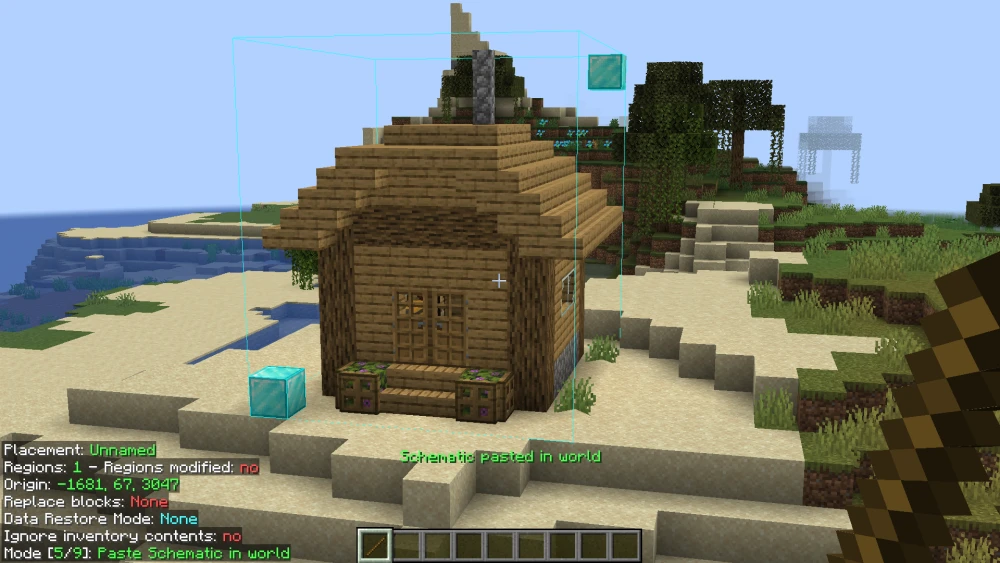
If done correctly, your schematic must now be placed as a solid build in your world.
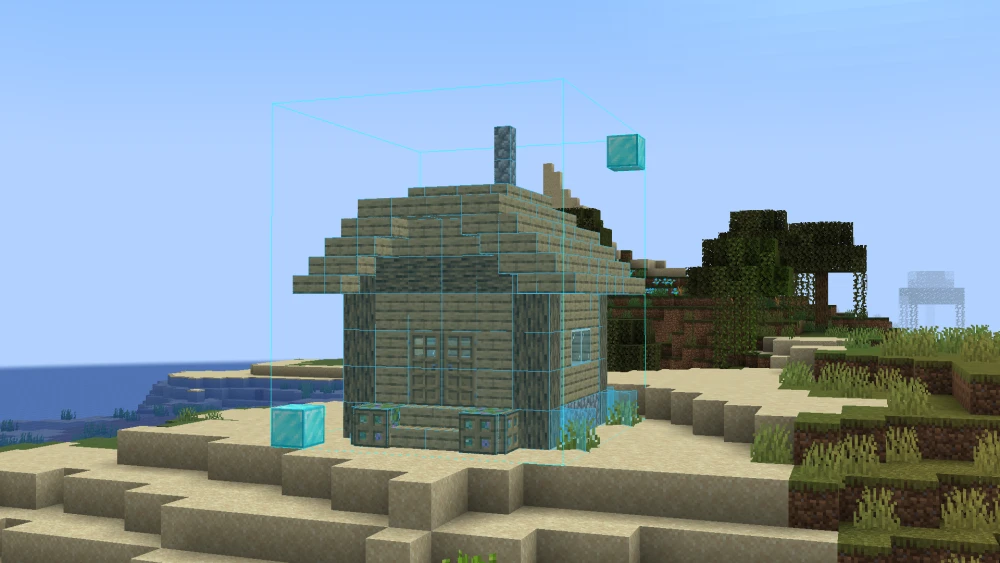
How to Unload a Schematic?
Once everything is done, it is now time to unload the schematic from your world. Follow the steps given below to unload a schematic.
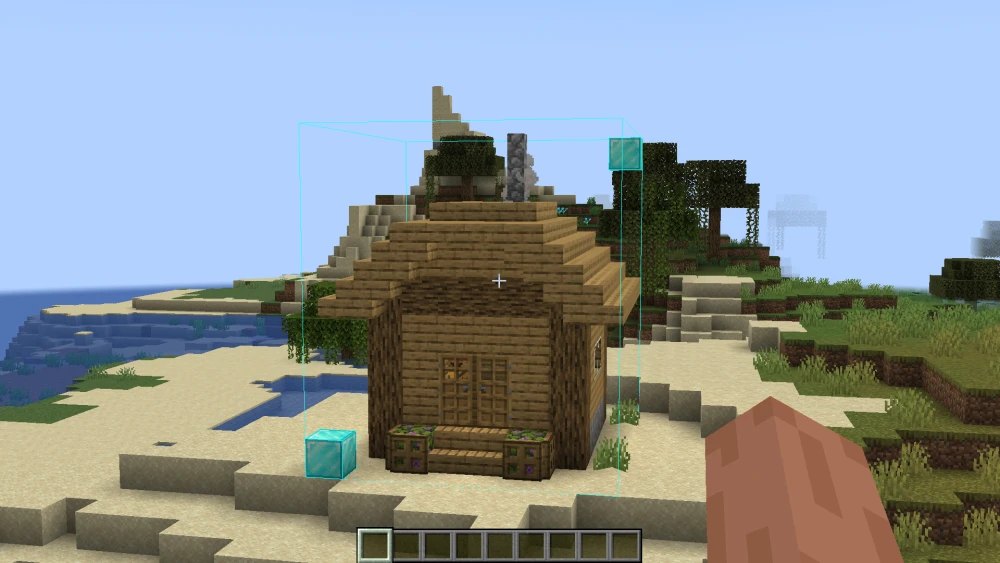
Even after the solid build has been pasted, the loaded schematic can still have parts of the bounding box visible.
You must unload the schematic to remove these.
Press M to open Litematica settings.
From here, press on the Loaded Schematics button.
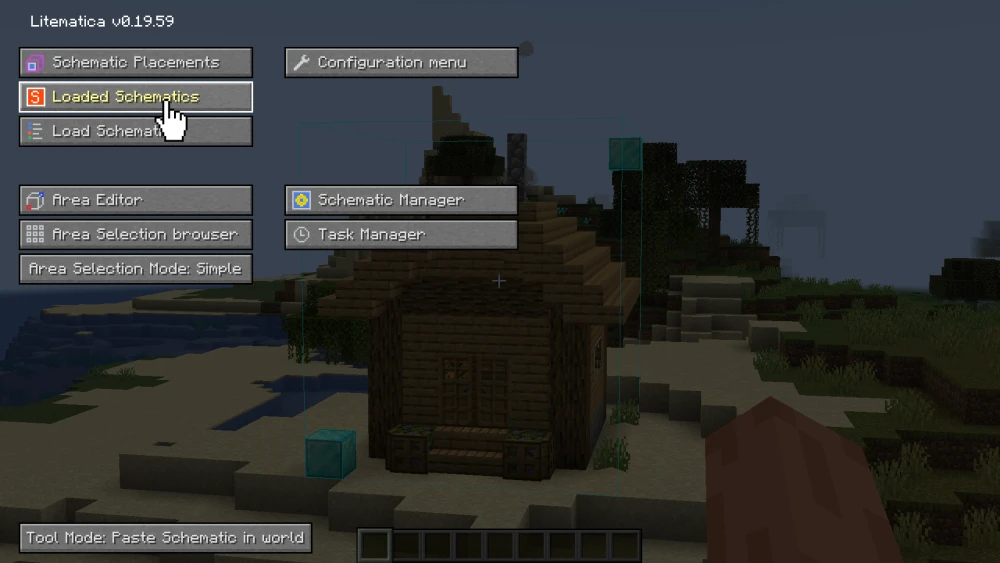
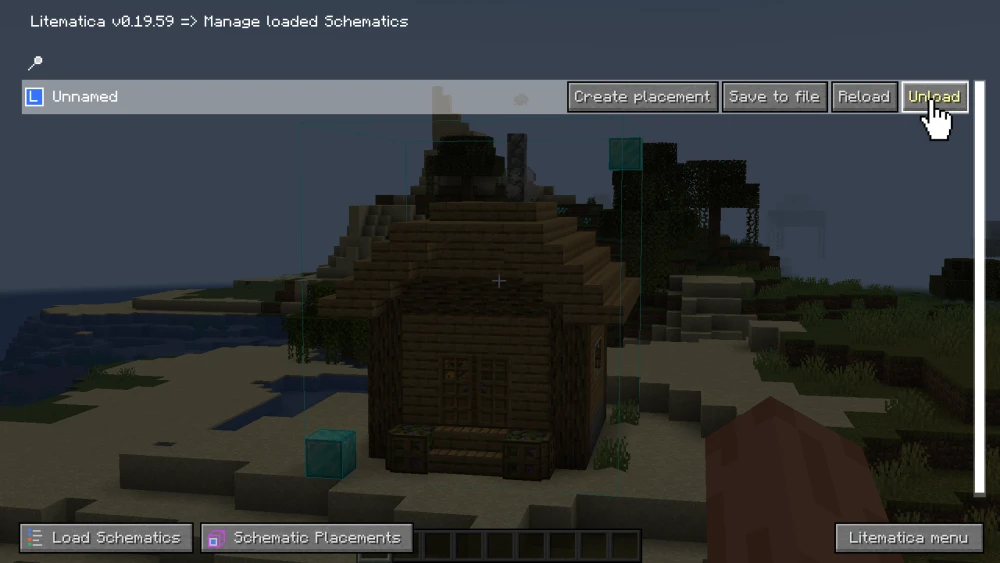
A list of loaded schematics will appear.
Press the Unload button given next to your schematic.
The name of the schematic must now disappear from the list.
Press esc until the settings are closed.
As you can see the schematic has been unloaded, leaving behind only the pasted build.
Conclusion
In the guide, you have learned some of the core operations and features of the Litematica mod. Using the above information, you will be able to copy builds, save schematics, share schematics, import schematics, paste builds between worlds, etc.
Go well with Litematica mod Suggestions
We think these additions will perfectly complement your gameplay
 mod
modCopy and paste builds between different worlds, share builds as files with your friends. Project holograms to make building complex contraptions feel like a breeze!
 mod
modCopy and paste builds between different worlds, share builds as files with your friends. Project holograms to make building complex contraptions feel like a breeze!
 mod
modCopy and paste builds between different worlds, share builds as files with your friends. Project holograms to make building complex contraptions feel like a breeze!
Other building mods Similar
Here are some similar mods to Litematica

 mod
modWant your builds to look cleaner and more immersive? The Invis Item Frame datapack lets you showcase items without the bulky frame, giving your creations a sleek, polished look that’s perfect for builders and mapmakers alike.
 mod
modEnables placing fences diagonally
 mod
modEnhance your builds with over 50 customizable block types offering unique functionalities, including glowing, ladders, and doors.
 mod
modMaster the power of Blood Magic to exploit forbidden rituals, create powerful altars, and command immense arcane forces
 mod
modEnhances building with new blocks, variants, and materials, including bamboo and throw-able pebbles
