Not rated yet
Creators and Publishers
MinecraftStorage
PublisherAdditional Links
You may find some useful information by following these links
https://modrinth.com/mod/create-aeronautics
Share this post
Create Aeronautics Mod

Let us now take a look at how you can build your own airship in Create Aeronautics. This guide explains all the essential blocks and explains all steps involved in the building process. The goal of this guide is to help you develop an intuitive idea of how this mod works.
What is the Physics Assembler in Create Aeronautics?
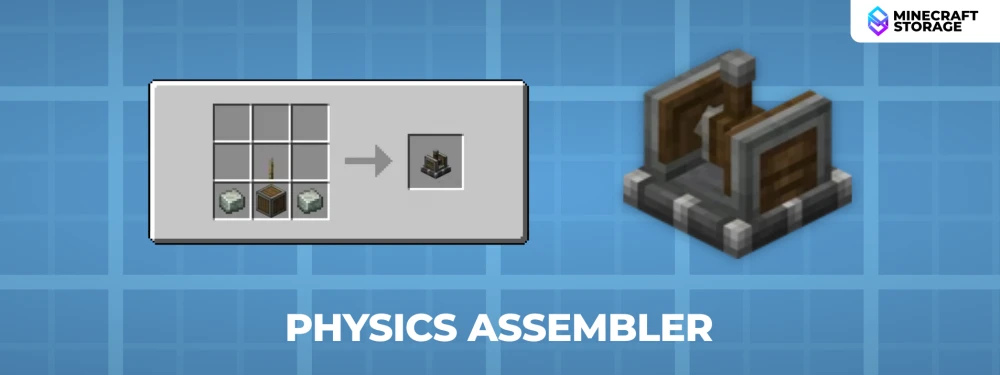
The Physics Assembler is the core of the Create Aeronautics mod. This is a device which will allow you to convert regular Minecraft blocks into simulated elements. When a block is converted into a simulated element, you will be able to move it freely around the world, without having the typical grid constraints of the game.
How to create a Simulated Element in Create Aeronautics?
Let us now take a look at how you can convert a regular block into a simulated element.
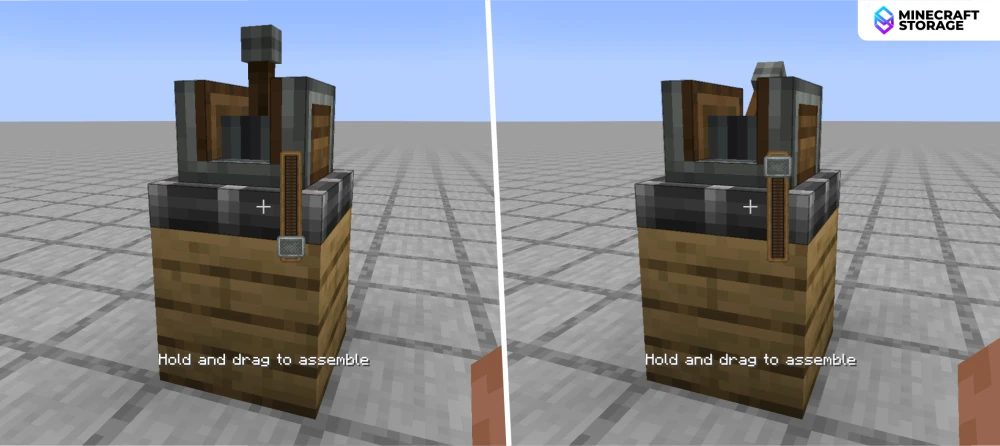
Simply place the Physics Assembler onto a block. If you hover your crosshair over the device, a tooltip that says "Hold and drag to assemble" will appear. Simply right-click on the assembler and drag using your mouse wheel. Once done, you will immediately notice that the shading of the simulated block has changed.
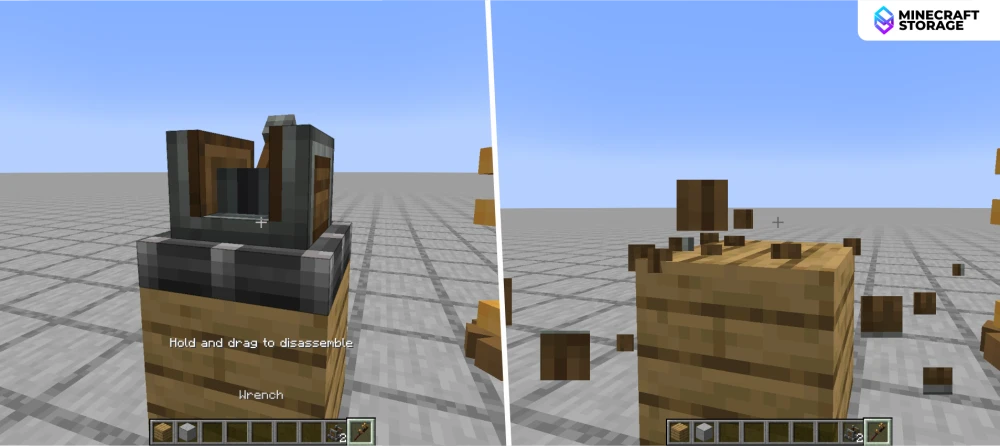
Once done, you can crouch + right-click on the assembler with a wrench to remove it safely. Now you have a simulated block that is completely isolated from the grid constraints of Minecraft.

In survival mode, you can left-click on the simulated element to move it around. The block basically has attained physics. This block can now move off-grid.
How to build a Simulated Part in Create Aeronautics?
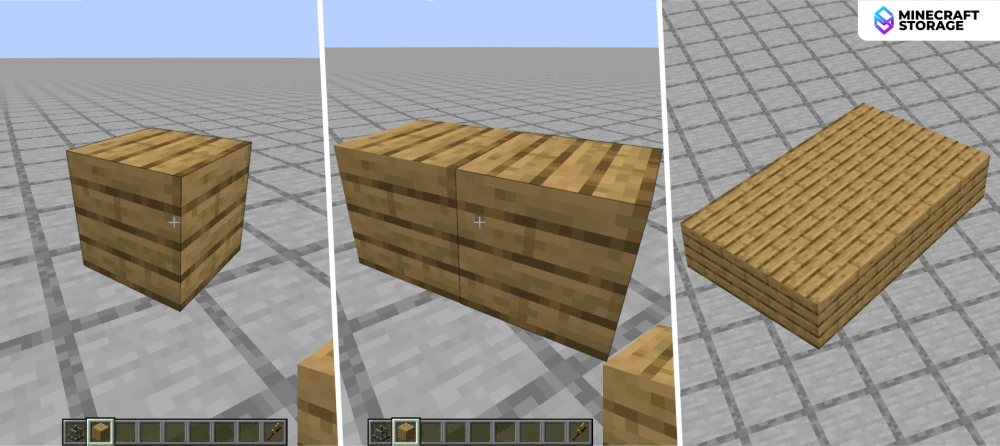
Once you have create a simulated element by following the previous steps, you can build a simulated part simply by building directly onto the simulated element. The part thus built will behave as a singular mass. Additionally, breaking a simulated part into two will make both parts behave as separate masses.
What is a Contraption Diagram in Create Aeronautics?
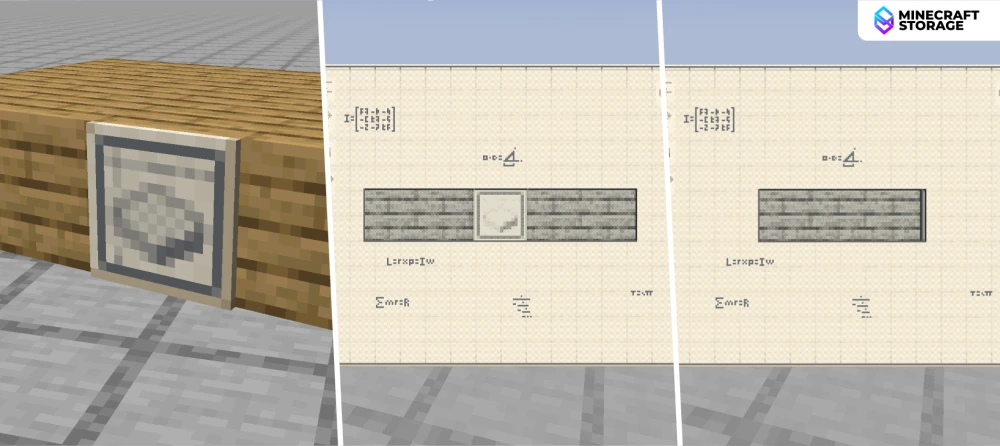
Combine a Physics Assembler and a piece of paper in a crafting grid to craft a Contraption Diagram. You can place the contraption diagram anywhere on a simulated build and right-click on it to open the diagram. The contraption diagram allows allows you to view your build from all angles and visualize the various forces action on it. This is crucial while building your contraption.
What is a Center of Mass in Create Aeronautics?
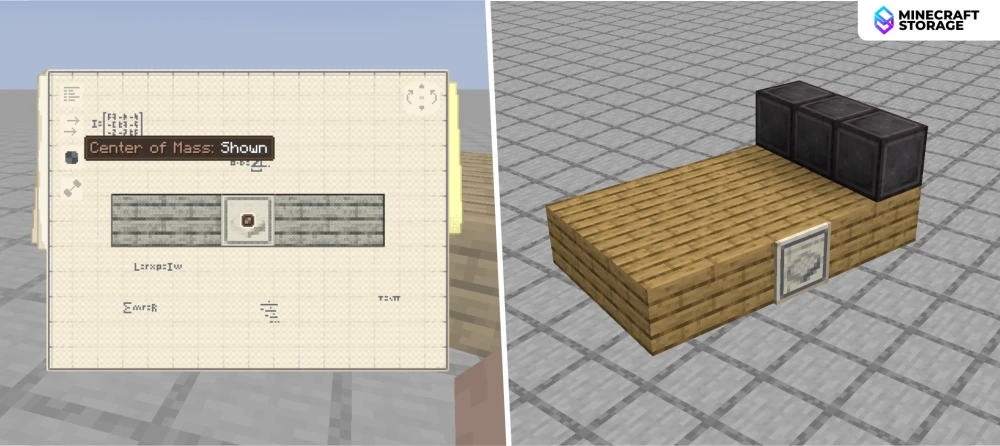
The concept of center of mass in Create Aeronautics is very much similar to real-world physics. The center of mass is an imaginary point where the mass of an object is said to be concentrated. In the contraption diagram, this is represented using a dot. The center of mass dot is hidden by default and you can enable it by clicking on the button on the top-left side of the contraption diagram.
For explanation purposes, we have placed heavy Netherite blocks on one end of our simulated part.
The heavy Netherite blocks cause the centre of mass of the build to shift sideways. This can be observed in the image above. The mass concentration basically shifted to the heavier side. For an air ship that is built to float, optimal positioning of the center of mass is crucial so as to prevent it from tilting or shifting.
Gravity in Contraption Diagram in Create Aeronautics
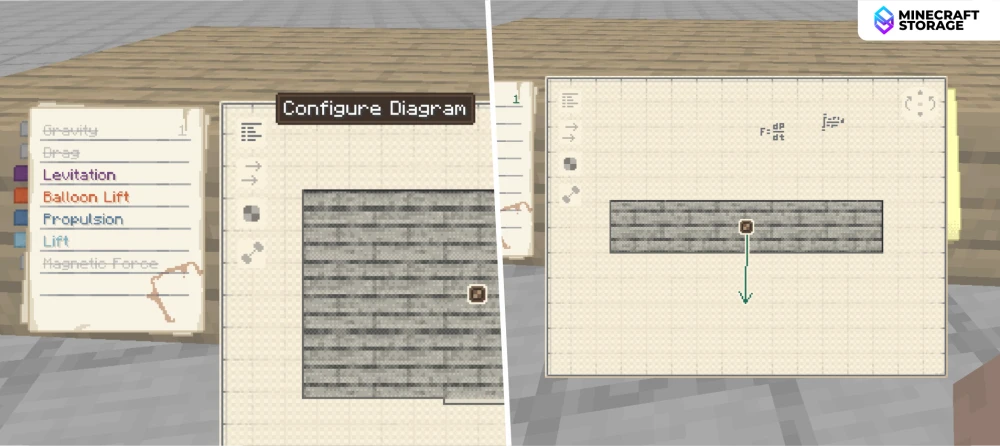
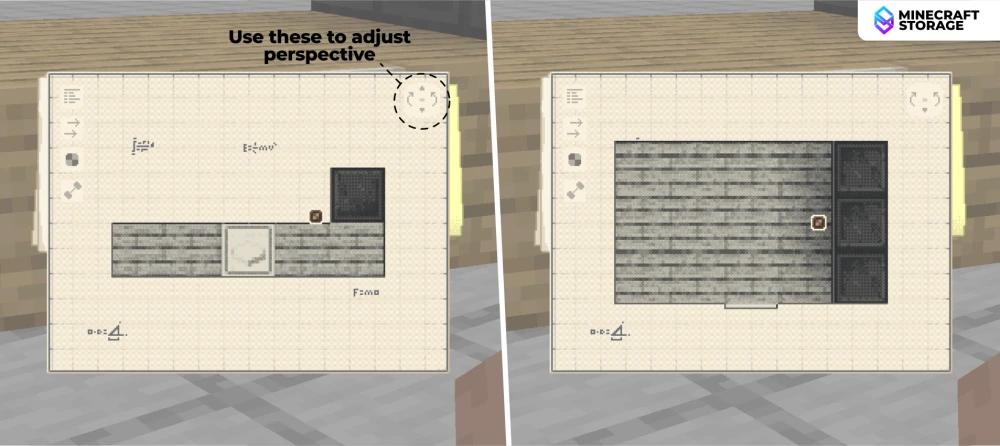
The top-most button on the left-side of the contraption diagram is a button to open more configuration option. Once opened, you will have the option to hide/view different features on the diagram. Gravity is hidden by default, click to enable. Once enabled, you will notice that a force vector representing the weight of the simulated build has appeared. It acts vertically downward from the center of mass.
Step-by-Step Hot Air Balloon Build Guide for Create Aeronautics
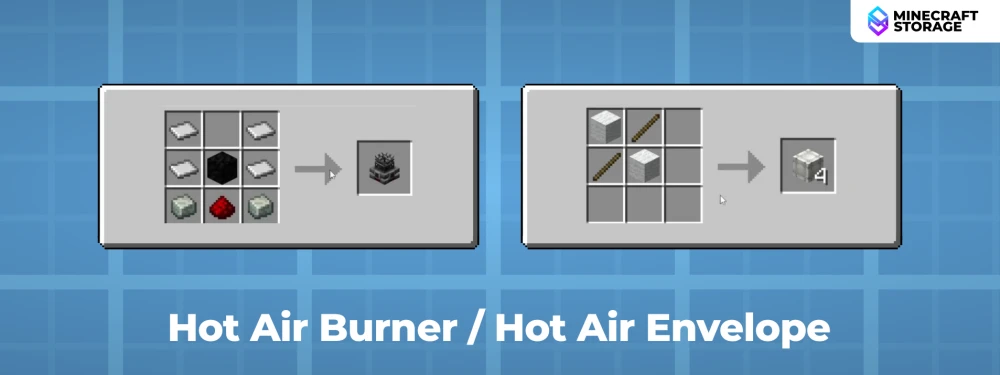
When it comes to building a hot-air balloon, the above two blocks are the core elements.
Hot Air Burner : Takes redstone input to burn and release hot air at configurable rates.
Hot Air Envelope : Can be placed as cavities above Hot Air Burners to capture the hot air.
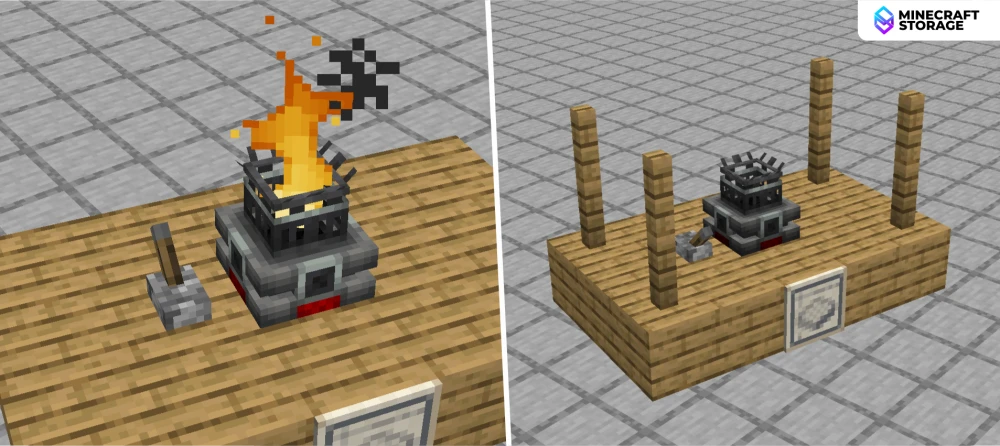
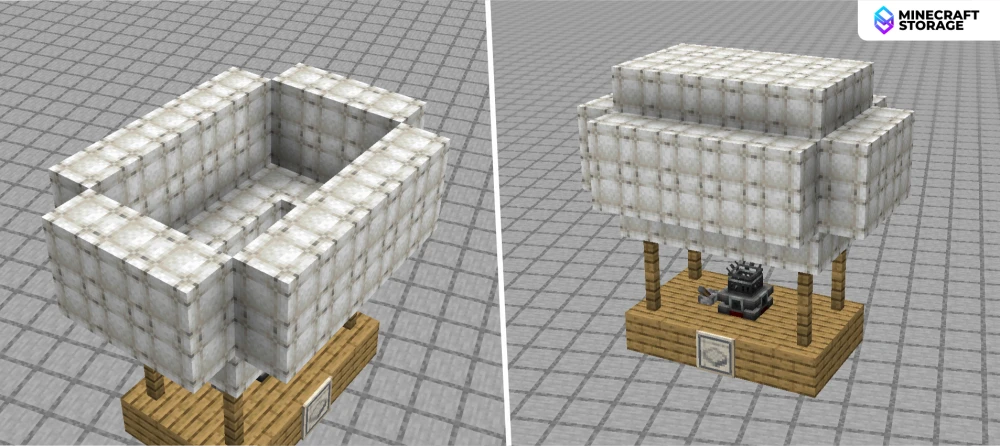
Place a hot air burner on your simulated build and activate it using a lever. Build posts on the corners of the build to attach envelope blocks.
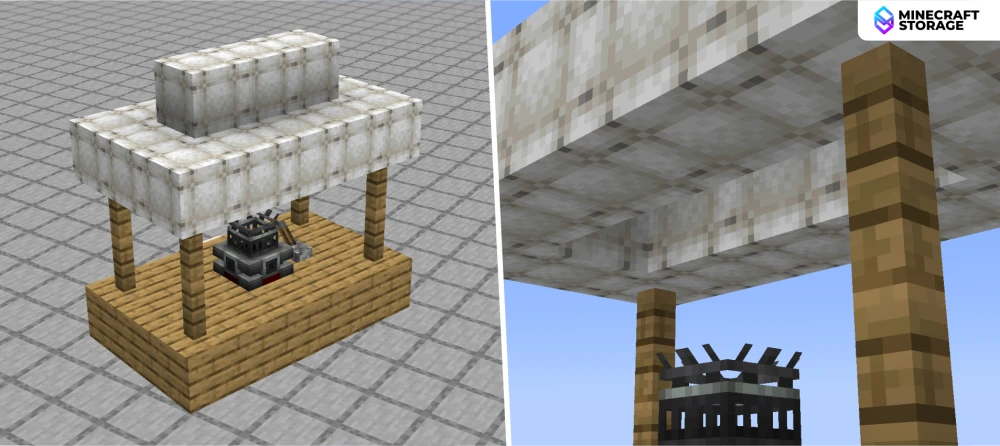
Let us now place hot air envelopes as shown below. It is important to note that it is not the envelope block itself that captures hot air from the burner. Multiple envelope blocks must be placed to form volumetric cavities that will capture hot air released by a burner below it. This is the balloon.
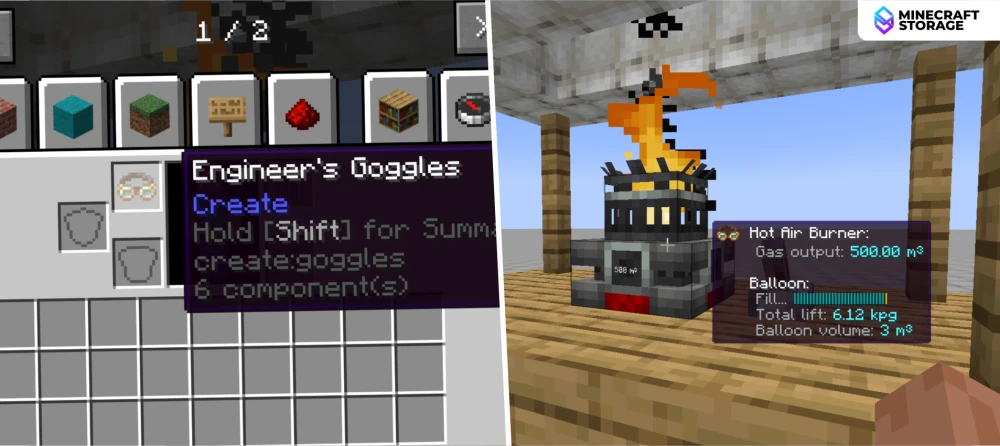
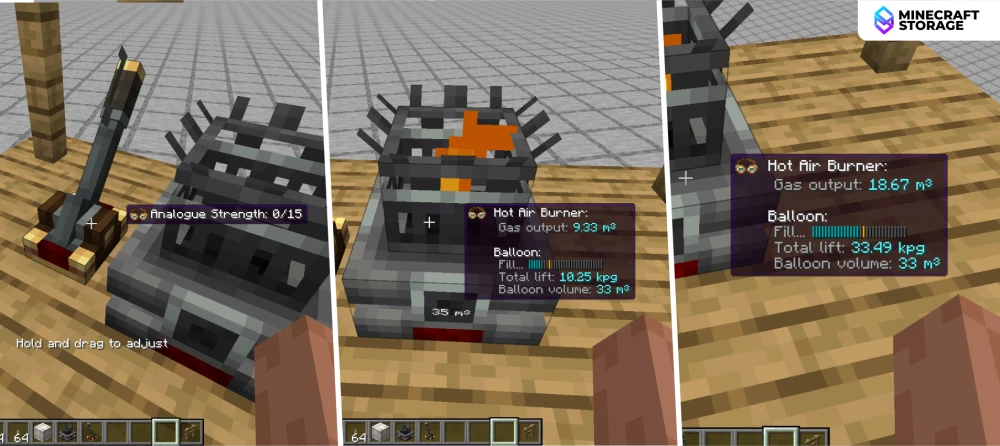
It is recommended to equip the Engineer's Goggles by Create. This allow you to see various data on functional blocks when you point your crosshair at them. Pointing at a burner will give you information regarding the total lift force created by the burner-balloon combo and the balloon volume.
How to Make Builds Float in Create Aeronautics?
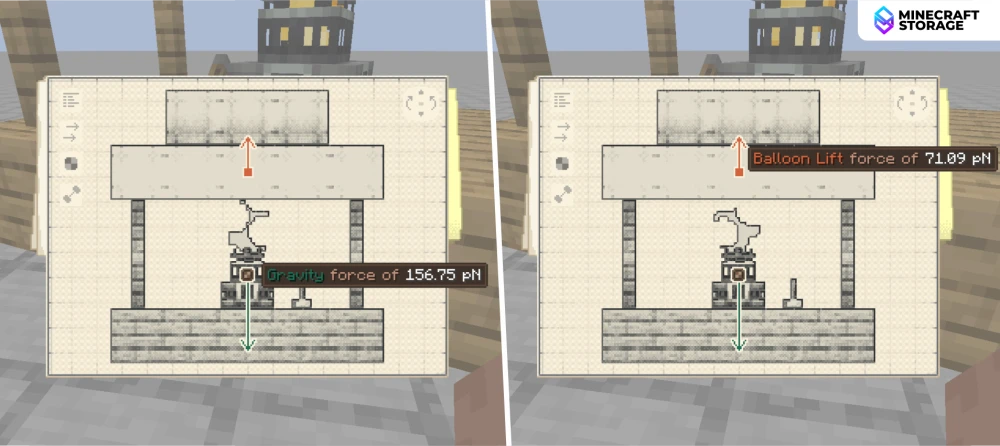
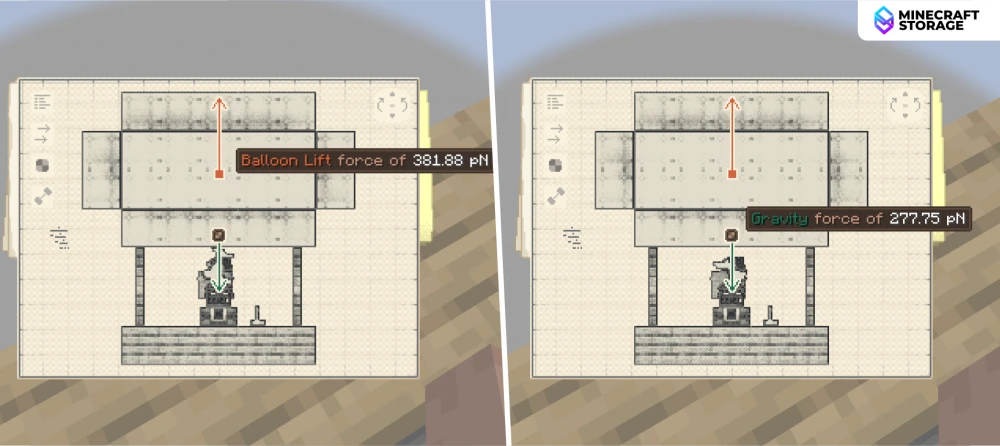
If you open the contraption diagram now, you will notice that a balloon force vector has appeared. This vector is directed vertically up, opposite to the weight of the build. You can also see the the balloon lift force is much lower than the gravity force, which is why the airship remains on the ground.
To increase the balloon lift force, we basically have to increase the balloon volume. This will allow the balloon to capture and store more hot air, thereby increasing the balloon lift force.
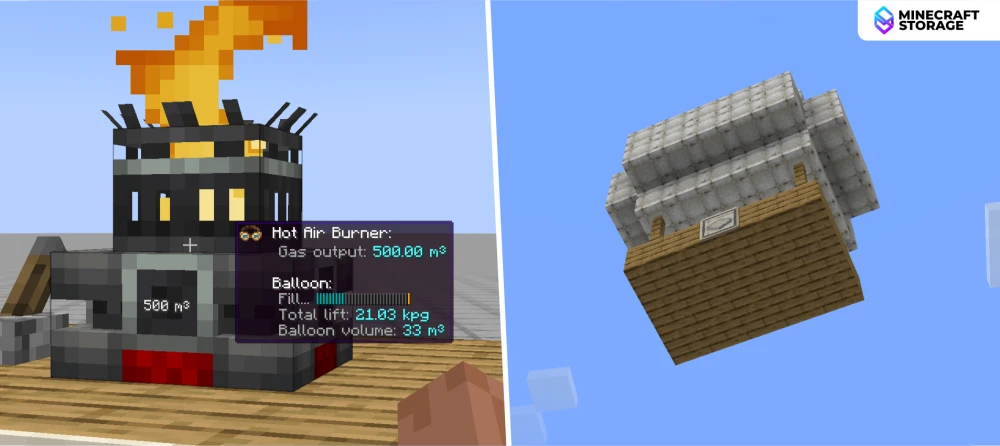
As soon as the balloon volume is increased, you will notice the build starting to float upwards. The tooltip on the burner also reflect this. Both the lift force and volume values have been increased.
In the contraption diagram, you can observe that the balloon lift force far exceeds the gravity force, which is what causes the build to float. But we do not want the build to go up indefinitely. We want it to stay floating at a constant elevation.
How to Calibrate Lift and Weight Balance in Create Aeronautics?
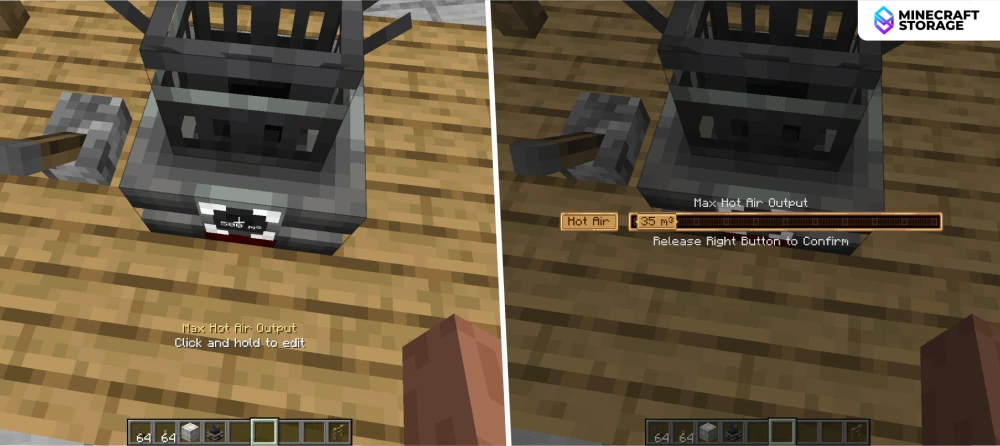
To keep the build balanced at a constant elevation, we basically have to bring the balloon lift force and gravity force into equilibrium. To do this, the first step is to reduce to the max hot air output. Simply right-click and hold on the designated part of the burner to open the slider to adjust the burner output. Bring the slider down to a value closer to that of the balloon.
In our case, the balloon volume is 33 meter-cube, and the closest value attainable to that on the burner slider is 35 meter-cube.
Also, replace the lever with an analog lever. This will give you a much more convenient way to configure the burner output, which will be essential once we begin to float. As we float up, the air pressure decreases, and we can adjust the burner output using this lever to balance the balloon lift force and gravitational force.
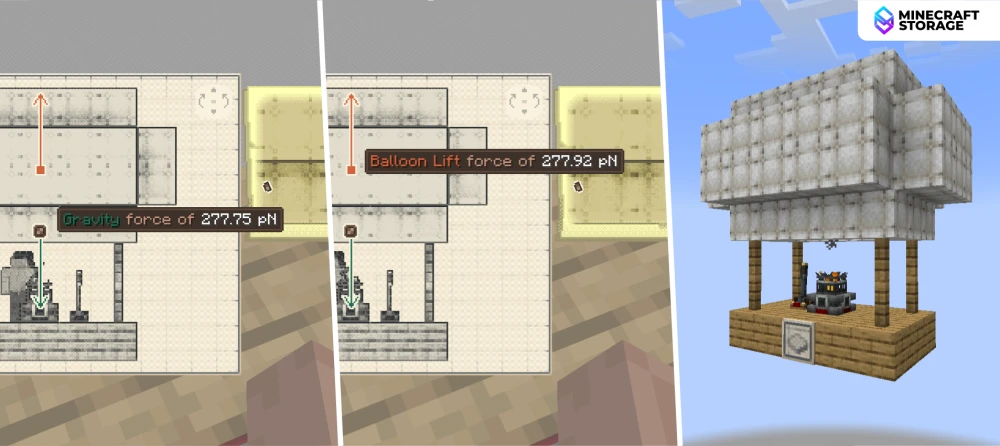
Float up to your desired height and use the calibration lever or burner slider to configure the burner output. This will in turn change the balloon lift force. Once you are at the desired elevation, the goal is to bring the balloon lift force value closer to the gravity force. This will help keep your build at a fixed elevation.
How Horizontal Movement Works in Create Aeronautics?
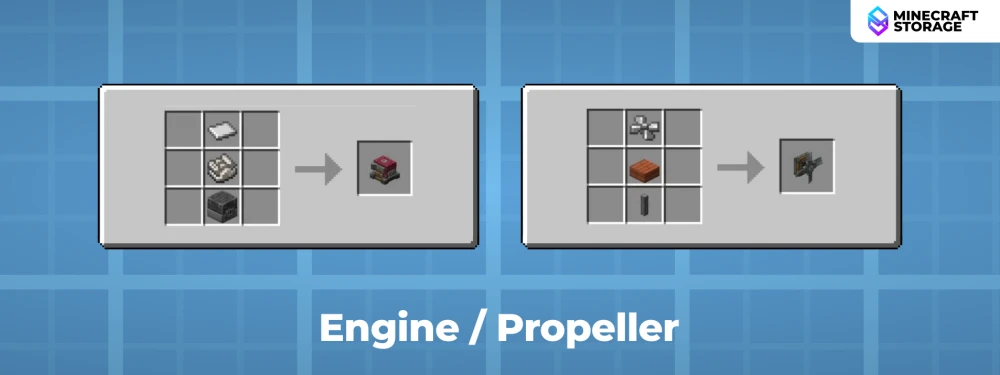
Let us now learn about two new mechanisms:
Engine : Generates mechanical rotation by taking fuel input.
Propeller : Rotates at configurable speeds to generate wind energy (force).
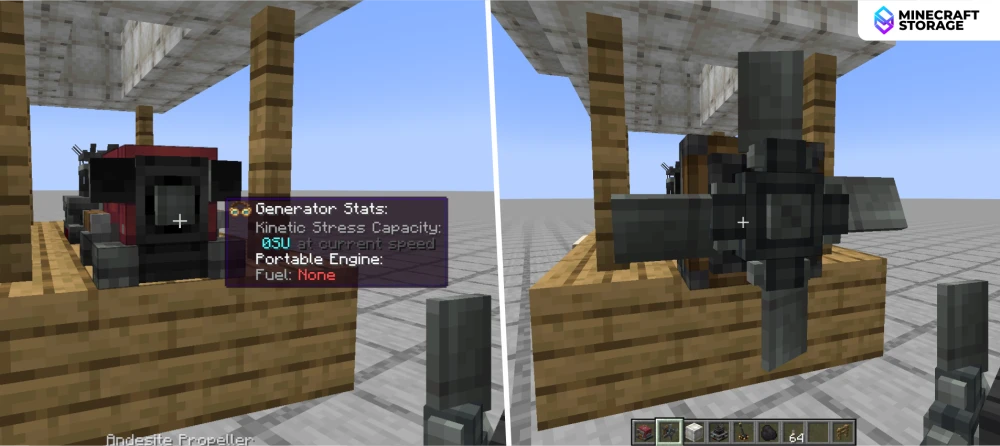
To make your hot air balloon move horizontally, simply attach an engine and propellor combo onto the build. Make both are oriented correctly.
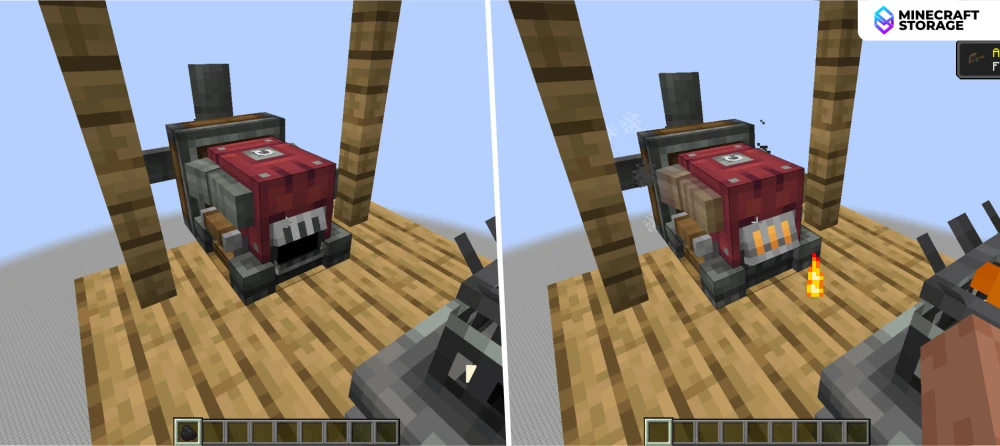
Let your hot air balloon float to your desired height. You can now turn on the engine by right-clicking on it with a fuel source like coal. The propellor will start to rotate. Make sure that the wind particles produced by the propeller are directed opposite to the direction you want to move. If not, the engine has a configuration option to toggle between clockwise and counter-clockwise rotation. Adjust if required.
The added weight of the engine itself will cause the center of mass to shift, causing the build to tilt in that direction. When engine is turned on, the acceleration caused by the propeller will cause an additional tilt. You can either place balancing masses on the opposite side of the build or we will overcome this issue creatively later on in the guide.
How to Control Airship Speed and Direction in Create Aeronautics?
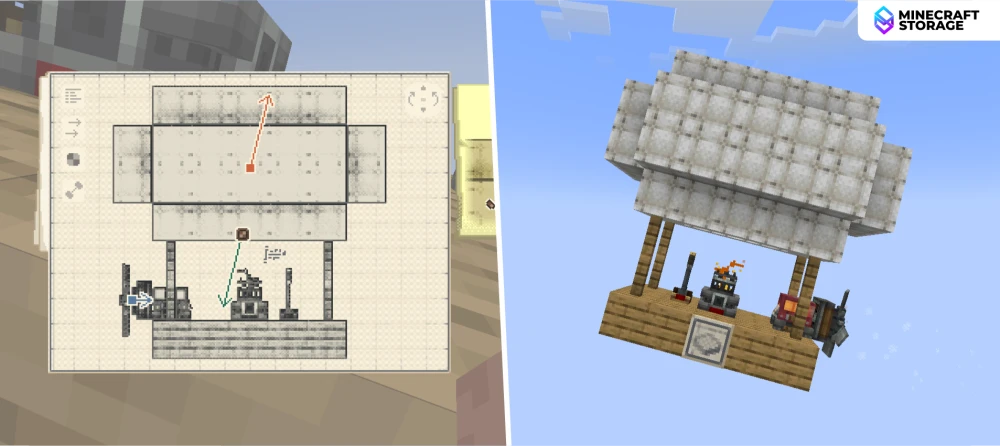
The contraption in the above section only allows you to float up and move forward. Let us now build a contraption that allows you to adjust the speed as well as change direction to horizontal movement.
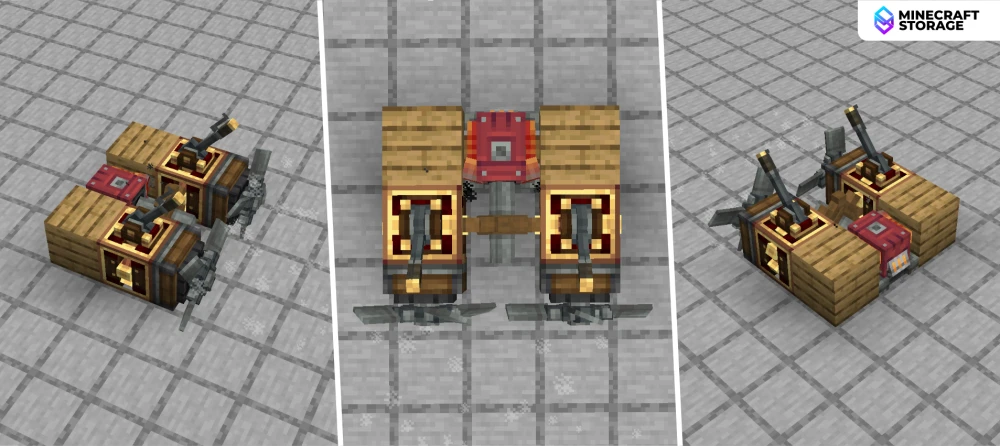
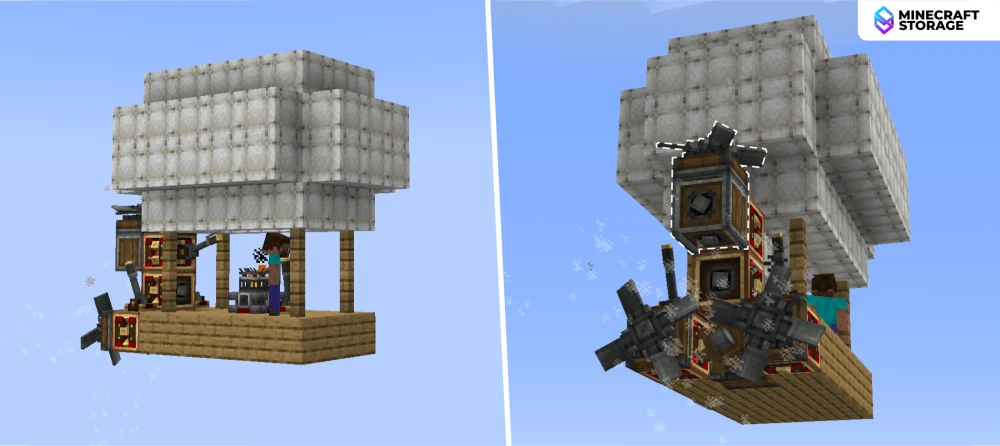
For achieving this, we are going to use the mechanism shown in the above image. Images are shown from different angles to help you identify the placement and orientation of each element.
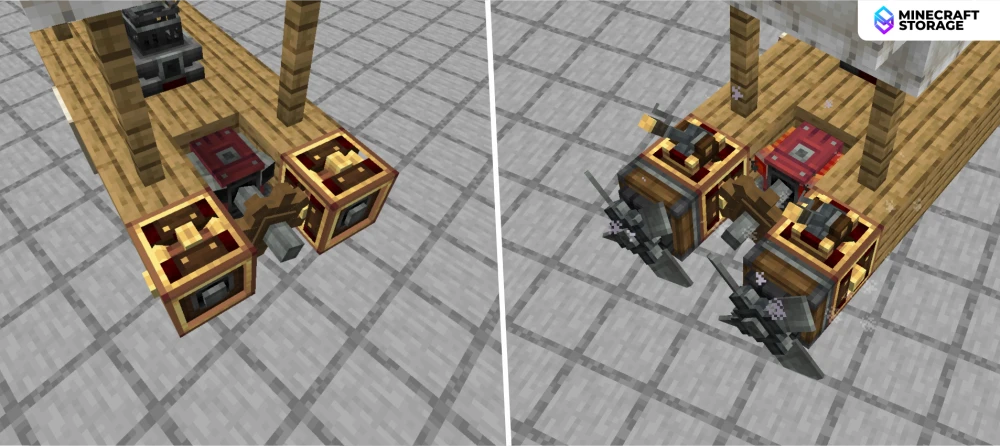
Attach the mechanism to our build as shown in the image above. This is what will help us control the speed and direction of the ship, using just two analog levers.
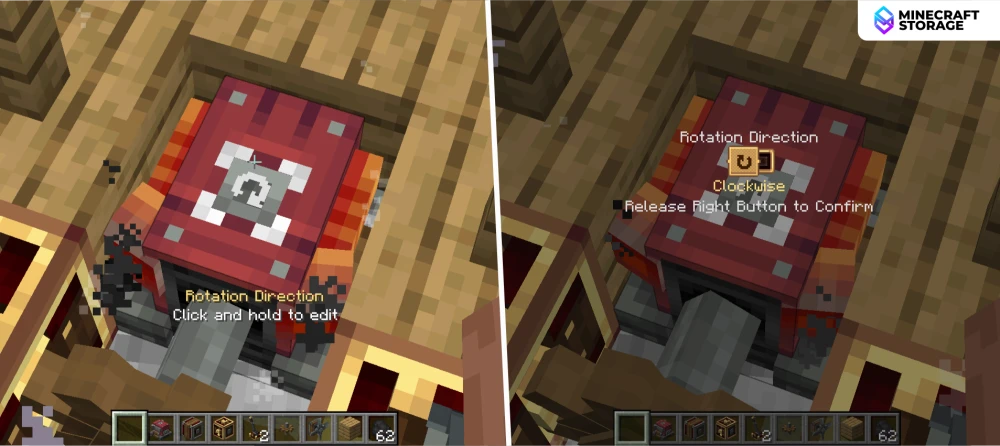
As discussed in the previous section, make sure that the propeller are rotation and generation wind force in the correct direction. You can adjust the direction directly on the engine, as shown in the image above.
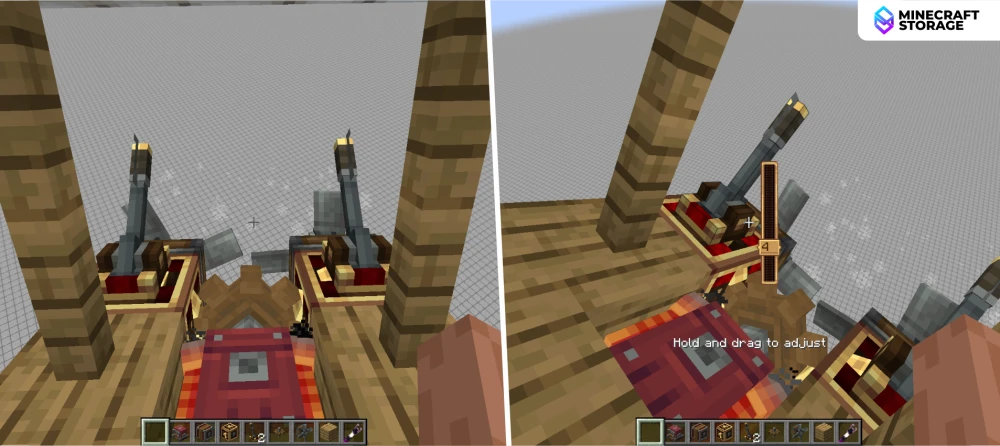
Float up to a desired height and turn on the engine. Both propellers will now rotate at the same speed.
You can adjust the propeller speed using the analog levers. A value of 0 is the default speed. Values from 1 to 14 will increase the rotational speed gradually. The maximum analog lever value of 15 will stop the propeller.
When you increase the speed on one of the propellers, the hot air balloon will turn in the opposite direction.
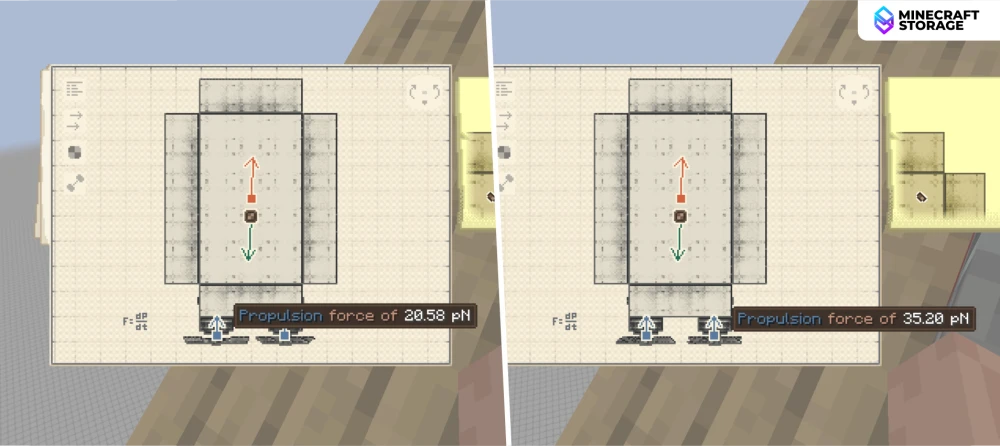
We increased the propeller speed on the right side, and the hot air balloon turned left. The contraption diagram shows the difference in force outputs of the both the propellers clearly.
Balancing the Hot Air Balloon - Task For Reader
All the combined weight of the engine-propeller system will cause the hot air balloon to tilt. Can you use the information from this guide to design a mechanism that will offset the directional tilt of the ship by producing a force opposing the tilt? Try it out! And let us know in the comments of this article.
