

Not rated yet
Creators and Publishers

MinecraftStorage
PublisherAdditional Links
You may find some useful information by following these links

https://www.curseforge.com/minecraft/mc-mods/hp-end-expansion
Share this post


HP End Expansion Mod
This mod brings new biomes, creatures, bosses, and powerful equipment to Minecraft’s End, giving players more to discover beyond the Ender Dragon.


HP End Expansion transforms the End’s outer islands with glowing reefs, meteor-scarred landscapes, new creatures, and summonable bosses. Its two signature weapons—the Bow of Stars and Tidelight Crossbow—gain additional abilities through collectible relics.
Explore the Starwreck Wastes
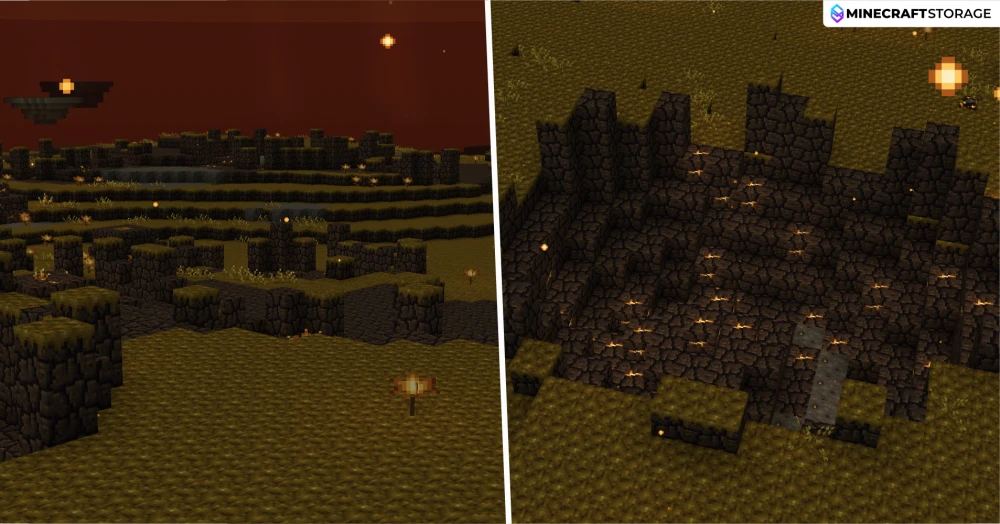
Starwreck Wastes is recognizable by its golden ground cover, dark stone, glowing crystals, and drifting embers. Search the outer End islands for this biome, then explore its craters and meteor formations for resources.
Starwreck Stone and Star Moss form much of the terrain.
Meteor Ash and Emberblooms add to its scorched appearance.
Ember Moths drop Ember Scale Dust, an ingredient for the Bow of Stars.
Ember Beetles supply Embers and occasionally drop Star Crystal Shards when killed by a player.
Meteor Tortoises, Star Callers, Star Martyrs, and Star Bearers provide more encounters as you explore.
Collect Star Crystals
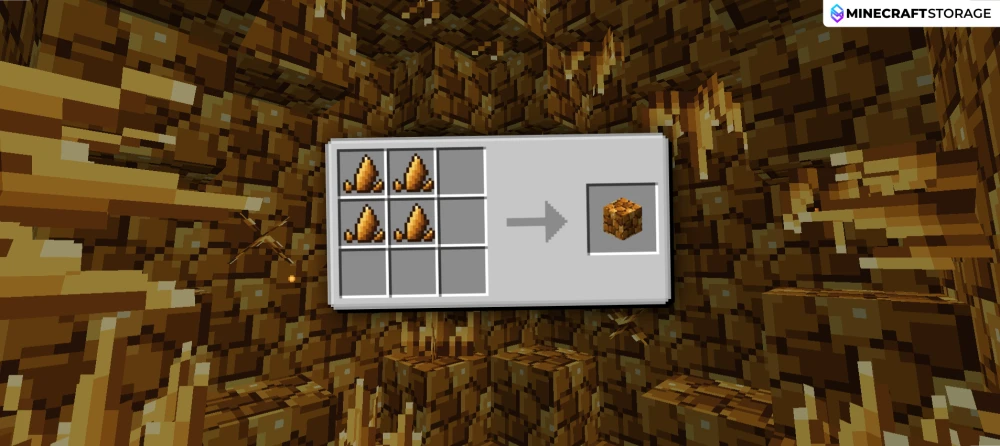
Star Crystal Shards support much of the biome’s equipment progression. Mine fully formed Star Crystal Clusters with a pickaxe to receive four shards before Fortune bonuses. Silk Touch preserves the cluster instead.
Arrange four shards in a 2×2 square to craft one Star Crystal Block. Keep both forms: shards serve as Bow of Stars ammunition, while blocks are ingredients for equipment and summoning items.
Craft the Bow of Stars
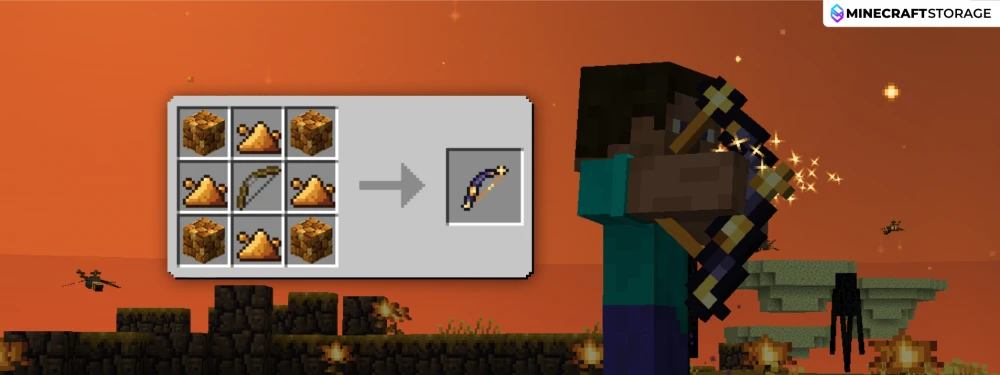
The Bow of Stars fires Star Crystal Shards as star projectiles. Hold right-click to draw it, then release to shoot. Gather crystals and hunt Ember Moths for the dust needed to craft your first bow.
Ingredients: Four Star Crystal Blocks, four Ember Scale Dust, and one ordinary Bow.
Place the Bow in the center, crystal blocks in the corners, and dust in the remaining spaces.
Carry Star Crystal Shards for ammunition.
Keep at least one shard available even when using ammunition-saving equipment.
Upgrade the Bow with Relics
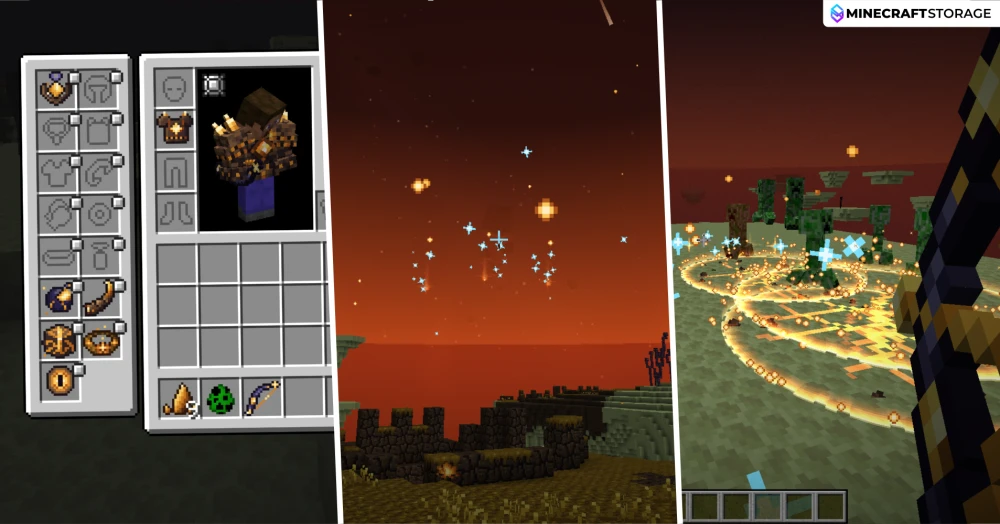
The bow becomes more versatile as you collect relics. Equip them in the Relic slots in your Curios equipment interface; the mod supplies five of these slots. The image shows multiple upgrades working together.
Starcall Pendant: Dropped by Star Callers. Adds two extra homing star bolts but reduces projectile speed by 25%.
Unstable Remnant Star: A chance drop from player-killed Star Martyrs. Adds stardust bursts on impact and calls down a small falling star when a creature is hit.
Ember Crown: Repairs the bow using inventory shards. One shard per second restores three durability; it stops when only one shard remains.
Holy Star: Prevents shard consumption and doubles bow damage against Skyrender.
Sky Eye: A Skyrender reward that doubles charge speed and fires automatically at full charge. Shots ignore the brief damage immunity after a hit, but deal 75% less damage.
Skyrender Horn: Removes projectile gravity and enables multiple charge levels at half charging speed. Its listed damage rises from 100% to 400% and 900% across three full charges.
Craft an Ember Crown by surrounding one Star Crystal Block with eight Emberblooms. The Crown and Starcall Pendant are accessible early upgrades; the Skyrender relics come later.
Craft the Star Core Chestplate
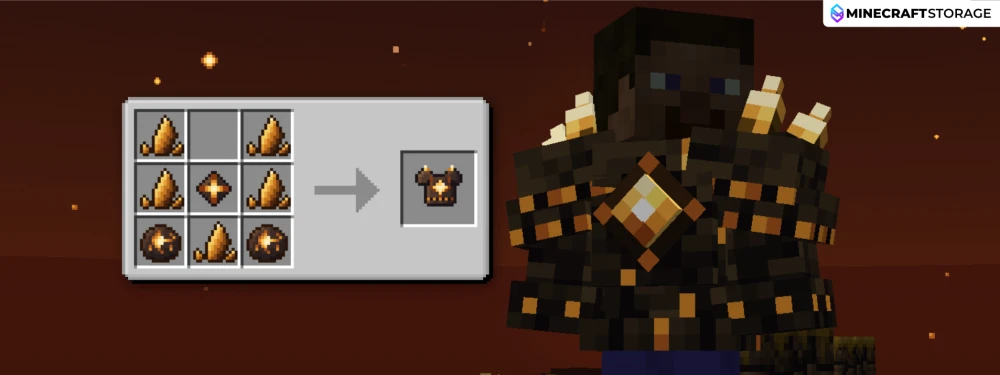
The Star Core Chestplate helps the Bow of Stars deal with groups. While you wear it, bow hits ricochet to the nearest enemy within 16 blocks, up to two times.
Ingredients: Five Star Crystal Shards, two Embers, and one Star Core Ember.
A Star Chaser provides a direct route to obtaining the required Star Core Ember.
Face the Star Bearer
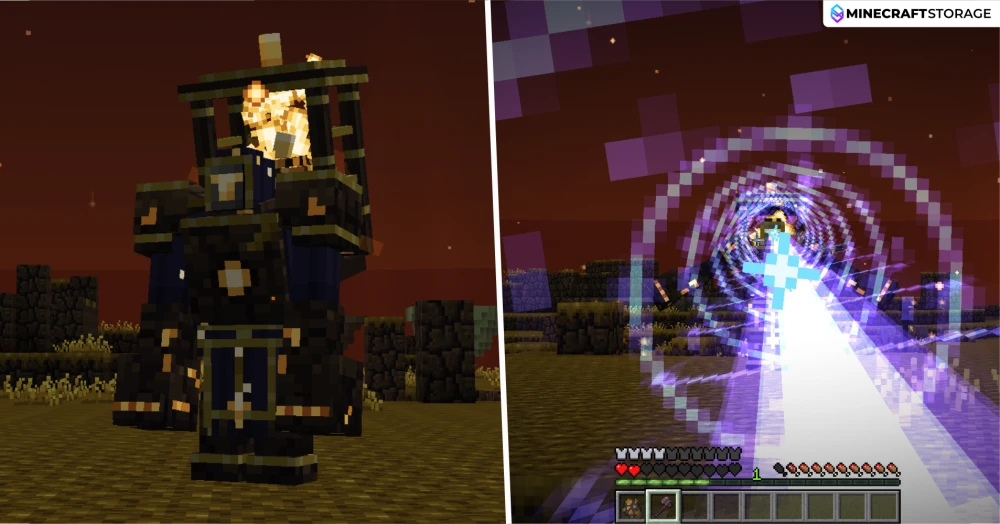
The Star Bearer is one of the biome’s more dangerous encounters. Its carried star introduces a choice: preserve it for a reliable Holy Star reward on death, or break it to create a temporary vulnerability window.
Rear attacks can damage its star.
Breaking the star creates an opening for additional damage.
A player kill provides a Starfall Omen, useful for triggering Star Rain.
Fight on broad ground so you have room to reposition around its heavy attacks and beam.
Obtain the Holy Star
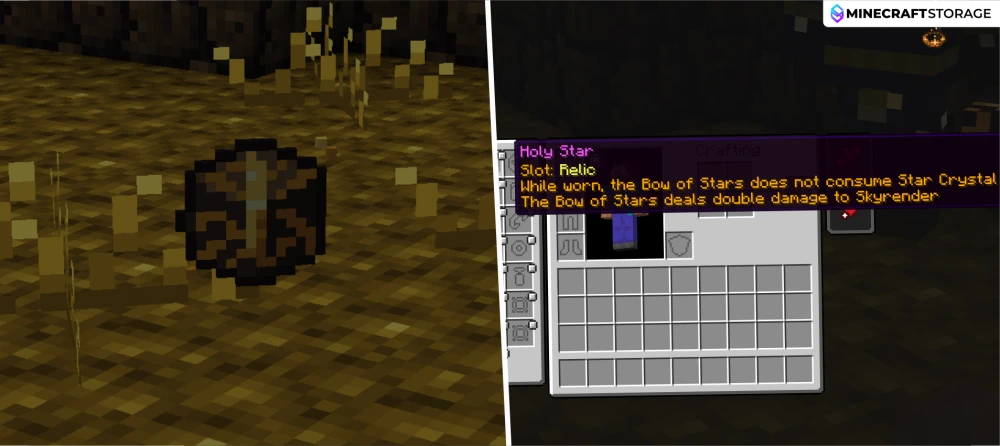
For the most reliable Holy Star route, defeat a Star Bearer while its star remains intact. Under normal mob-loot rules, it drops a Holy Star. Breaking the star during combat instead gives a 30% chance to release one at that moment.
Equip the Holy Star in a Relic slot to stop the Bow of Stars from consuming shards.
It also doubles bow damage against Skyrender, making it valuable preparation for that boss.
If you break the star and secure a player kill, the Star Bearer has a separate chance to drop a Star Core Ember: 15% before Looting bonuses.
Start a Star Rain Event
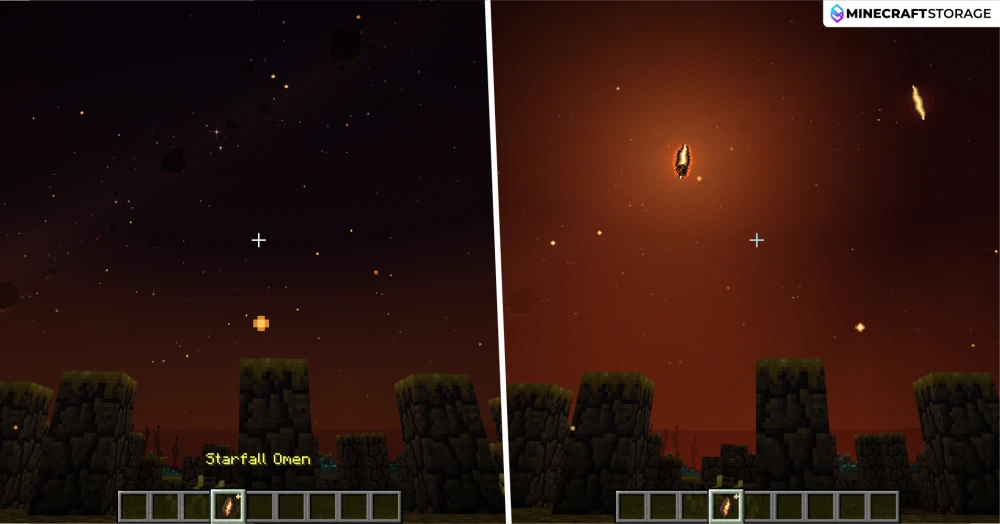
Use a Starfall Omen in Starwreck Wastes to trigger Star Rain manually. The item is consumed when activation succeeds, and nearby open ground is needed for meteor landings. Only one Star Rain event can run in a dimension at a time.
Player-killed Star Bearers provide an Omen.
Star Callers and Star Chasers can also drop one.
Natural events become eligible roughly six to eight minutes after the previous event ends, with a player in the biome and suitable landing space nearby.
Prepare away from island edges, leaving room to move around impacts.
Survive the Falling Meteors
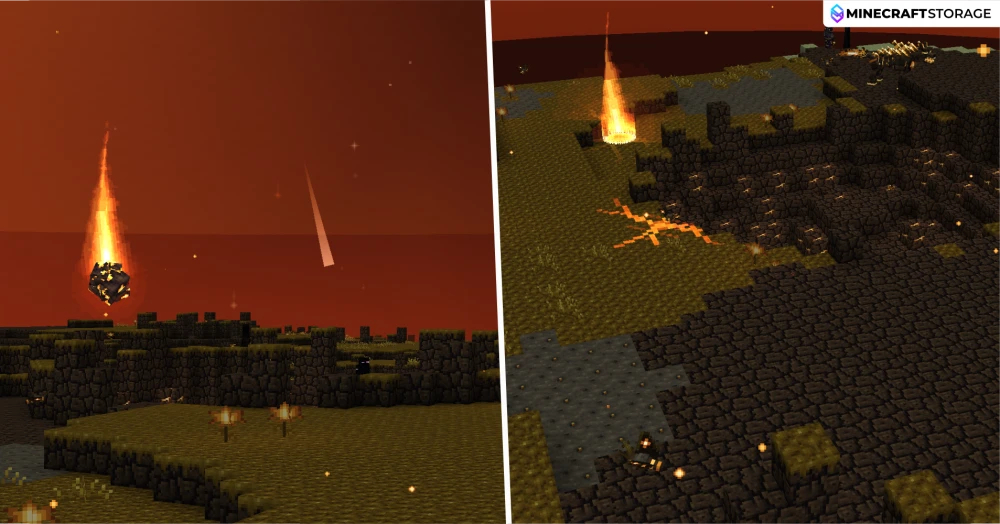
During Star Rain, rifts send flaming meteors toward the ground. The event lasts approximately five minutes at normal game speed. Watch the sky and keep moving instead of waiting at a landing point.
Each meteor impact has a 10% chance to spawn a Star Chaser.
A maximum of two Star Chasers can spawn during one event.
An event does not guarantee a Star Chaser, so another attempt may be necessary.
Defeat the Star Chaser
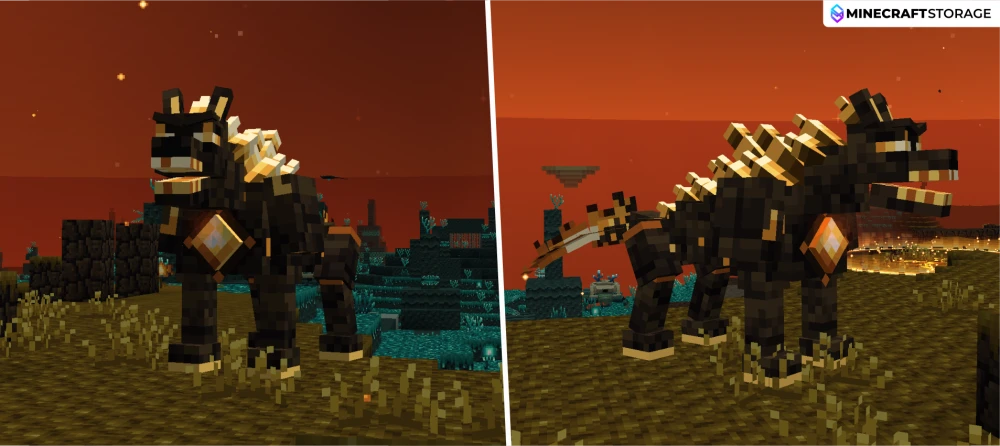
The Star Chaser is an event elite with a glowing chest core, crystalline growths, and a comet-like tail. A player kill awards a Star Core Ember, alongside shards and Embers, helping you work toward the chestplate or Skyrender summon.
Charge: Move sideways when it winds up.
Tail sweep: Avoid staying directly behind it.
Stomp: Leave room to retreat from the shockwave.
Half health: Expect a meteor-summoning phase.
Quarter health on Normal or Hard: Its speed and ability frequency increase.
If no attackable players remain nearby for an extended period, it can leave without dropping loot.
Summon Skyrender
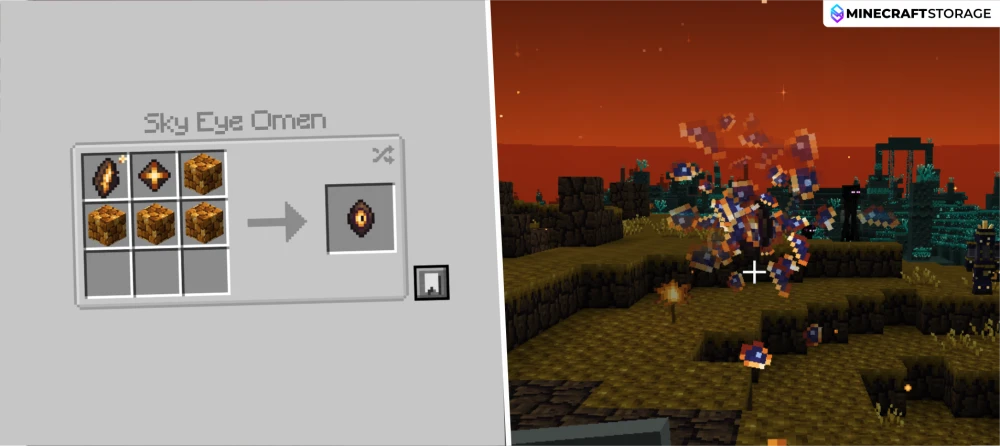
Craft a Sky Eye Omen with one Starfall Omen, one Star Core Ember, and four Star Crystal Blocks. This recipe is shapeless, so the ingredients can be arranged in any order.
Use the Omen inside Starwreck Wastes.
Wait until Star Rain has ended.
Choose an open area with room for the boss to land.
Another Skyrender cannot already be present in the dimension.
The Omen is consumed on a successful summon.
Fight Skyrender and Counter Its Gaze
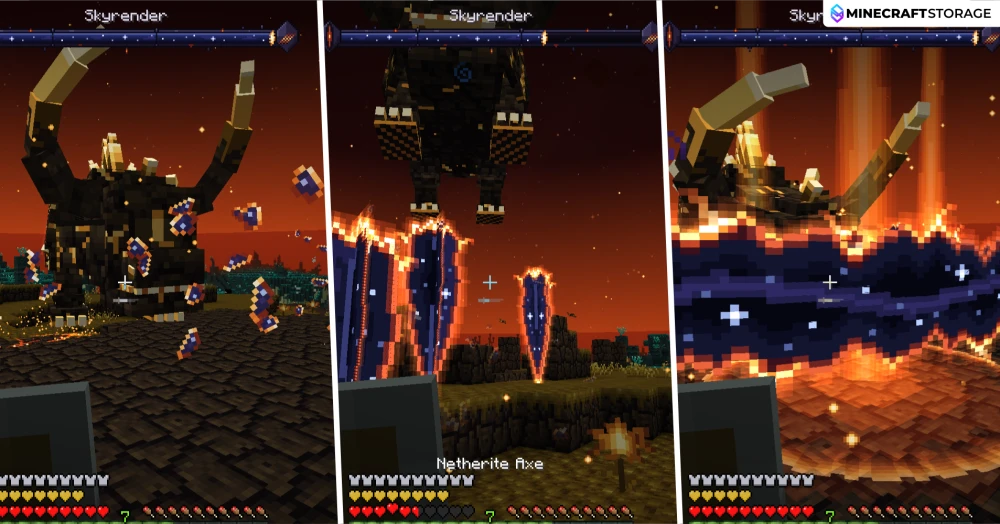
Skyrender combines horn attacks, raking strikes, tail attacks, leaps, projectiles, and a dangerous gaze. Use its recovery windows to attack, then reposition when another ability begins. The Bow of Stars with a Holy Star benefits from a dedicated damage bonus against this boss.
During its gaze charge, hits to the head/eye weak point contribute toward an interruption. Enough damage staggers it.
If you cannot interrupt, move outside its forward viewing area or use substantial cover to break line of sight.
Turning your camera away does not counter the gaze. The check concerns whether Skyrender can see you.
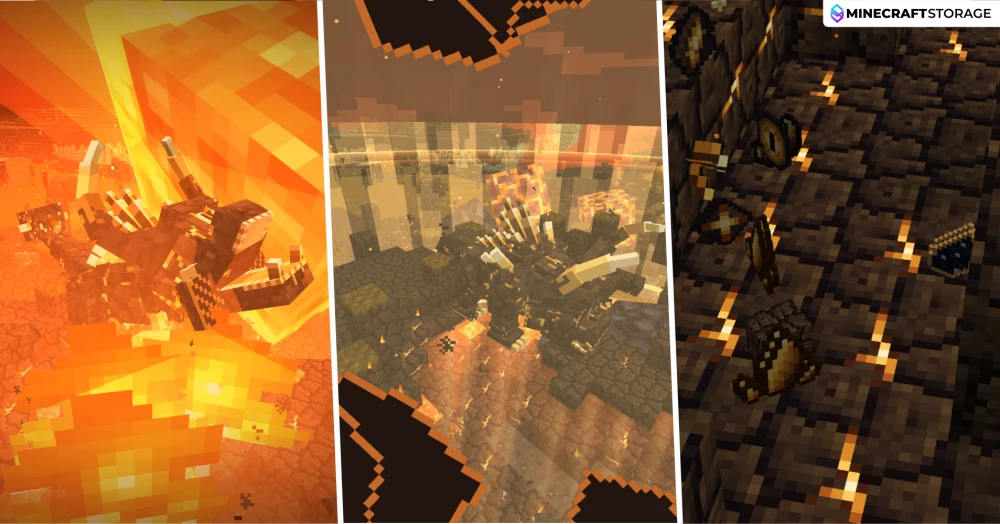
Skyrender also performs a major meteor sequence. Treat large visual windups as a cue to reposition and watch the arena before resuming attacks. Its rewards extend the bow’s progression beyond the equipment you brought into the fight.
Sky Eye and Skyrender Horn: Unlock different charging and firing styles.
Sky Fragments, Star Core Embers, and Star Crystal Shards: Form part of its material rewards.
Starfall Omen: Allows another manual Star Rain event.
Most listed rewards require a player kill.
Discover the Tidelight Reef
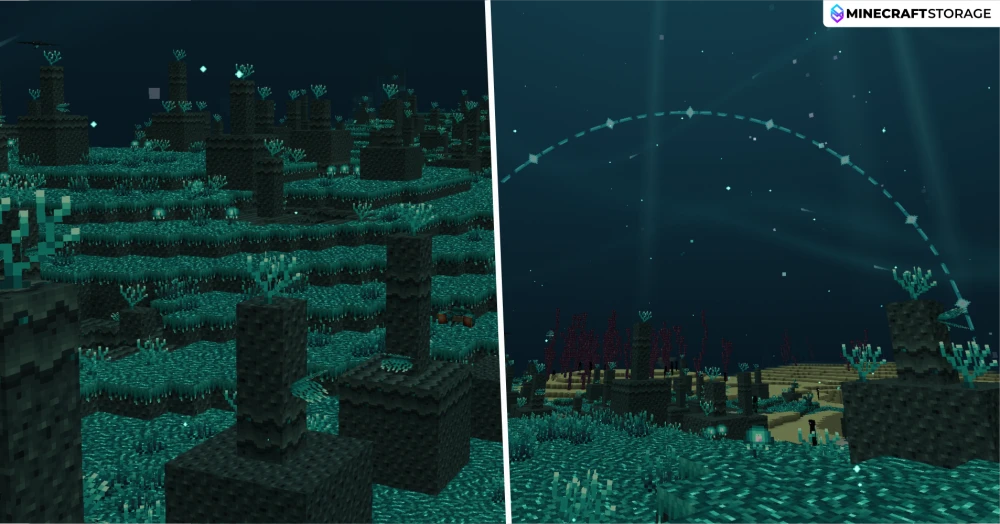
Tidelight Reef replaces the warm colors of Starwreck Wastes with luminous turquoise terrain, coral, and drifting creatures. This biome supplies materials for the Tidelight Crossbow, its relics, and a collection of decorative blocks.
Break Pearl Clams without Silk Touch to collect Tide Pearls. Fortune can increase the yield.
Break Lumen Coral Blocks without Silk Touch for one or two Lumen Coral Branches.
Use shears or Silk Touch to preserve coral plants and fans.
Use Silk Touch to collect the solid coral block.
Bring shears when gathering Glowkelp Pods from Hanging Glowkelp.
Search the Reef’s Structures
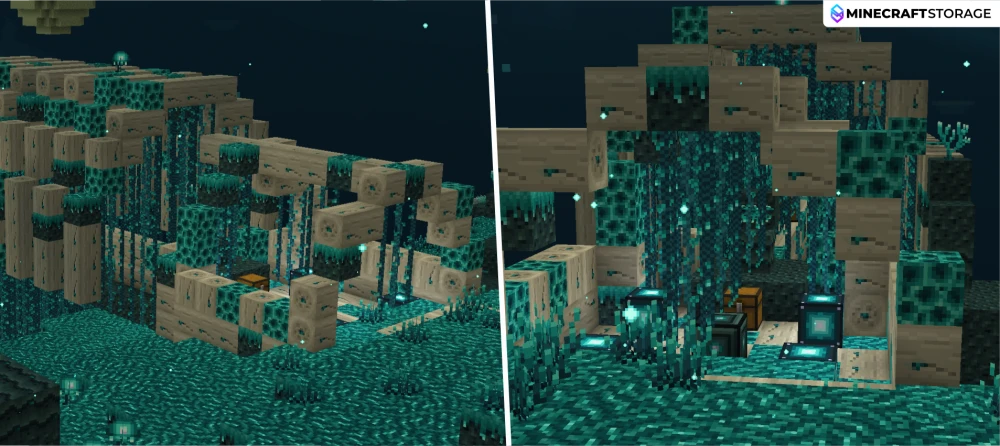
Look for Tide Shrines and Whalefall Reefs while exploring. Their chests offer another source of materials, and the structures provide landmarks among the glowing terrain.
Both chest-loot tables include Tide Pearls, Glowkelp Pods, and Reef Eel Scales.
Whalefall Reef loot also includes Tidelight Gel, Reef Bone Blocks, and enchanted books.
Leave inventory space for building materials if you want to bring the biome’s appearance home.
Meet the Reef’s Creatures
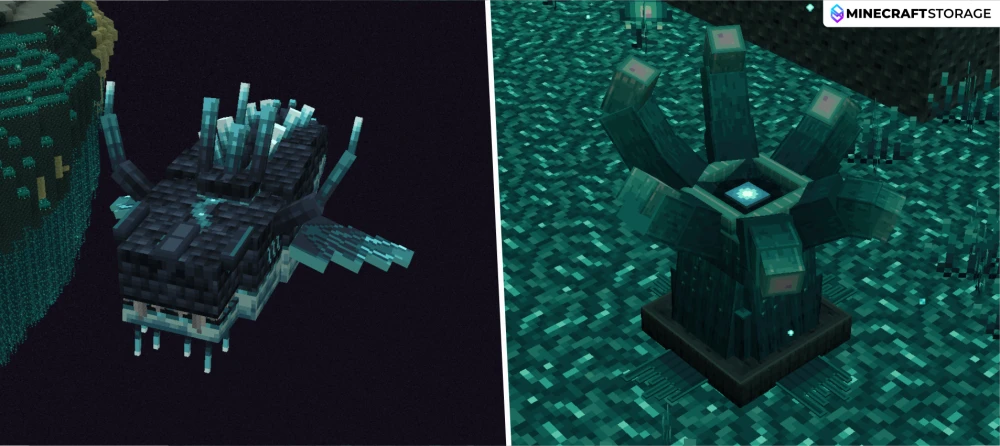
Several reef creatures supply crossbow relics. The skull-carrying Tide Remnant Hermit Crab and plant-like Tidecrown Anemone are useful targets once you begin assembling that equipment set.
Tide Remnant Hermit Crab: Drops the Tide Remnant Claw.
Tidecrown Anemone: Drops the Tidecrown Tentacle.
Tidelamp Wyrm: Drops the Abyss Crystal Spine.
Tidebreaker Warlord: A rare natural spawn that drops the Tidebreaker Hammer Core.
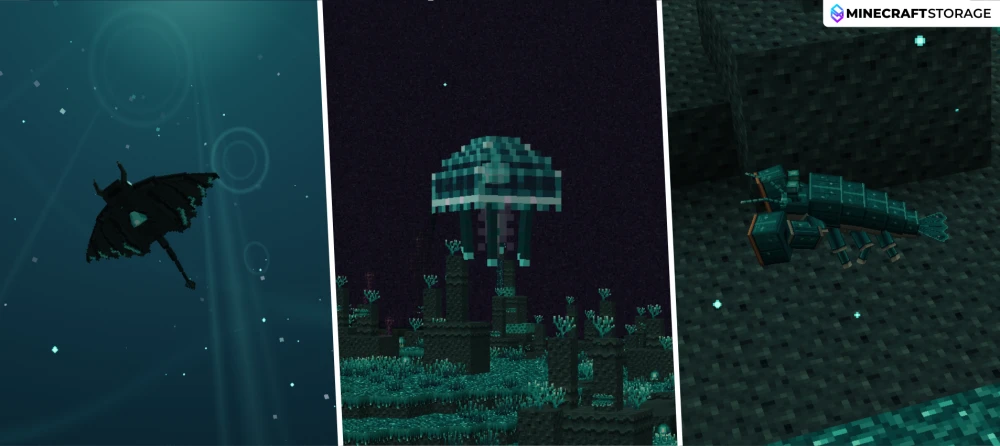
Other encounters provide materials for exploration and boss summoning. In version 2.2, Void Rays spawn in Tidelight Reef; hunt them when you are ready to gather ingredients for the Star Beacon.
Void Ray: Drops Ray Membranes and awards a Void Core on a player kill.
Lantern Jellyfish: Drops Tidelight Gel.
Tidebreaker Mantis Shrimp: Drops a Tidebreaker Gauntlet.
Glimmerfin: Adds to the biome’s creature population.
Craft the Tidelight Crossbow
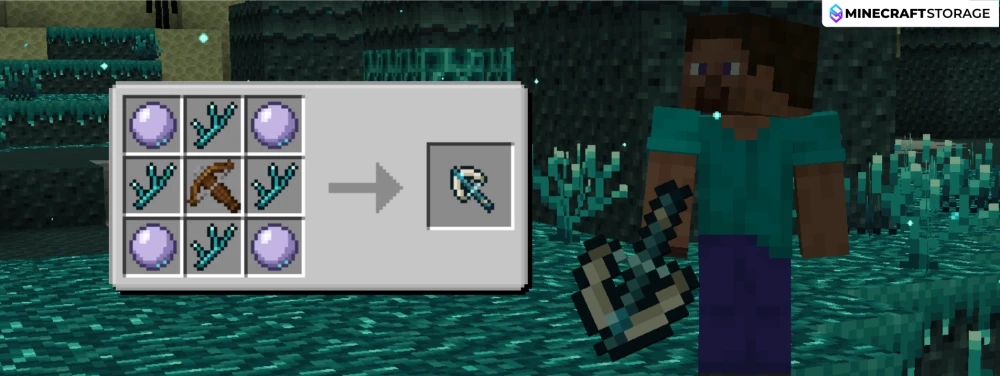
The Artifact · Tidelight Crossbow stores loaded rounds, allowing repeated shots before reloading. Craft it with four Tide Pearls, four Lumen Coral Branches, and one ordinary Crossbow.
Place the Crossbow in the center, pearls in the corners, and branches in the remaining spaces.
Hold right-click to load until the weapon is full or you run out of ammunition.
Release right-click, then left-click to fire.
Watch the loaded-round display and carry arrows for ordinary use.
Holding the weapon in either hand grants arrow-damage immunity. This does not protect against every projectile; thrown tridents are excluded.
Build a Crossbow Relic Set
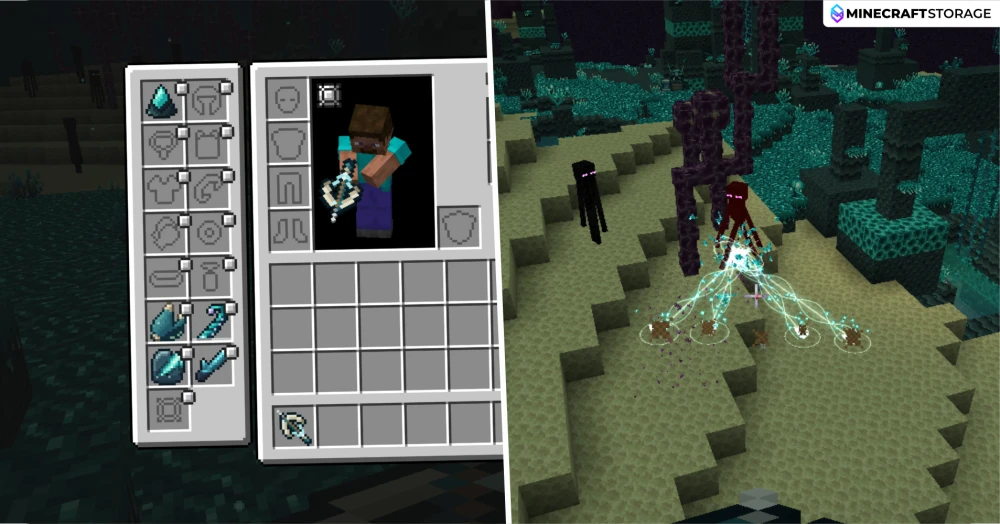
Crossbow relics reward increased capacity and keeping the weapon loaded. Equip them in Relic slots, then check your loaded-round display before beginning a fight.
Void Core: Adds three points of crossbow capacity.
Tide Remnant Claw: Adds one extra projectile for every two points of capacity.
Tidecrown Tentacle: Loads one round every three seconds into the Tidelight Crossbow with the most loaded rounds.
Tidebreaker Hammer Core: Adds arrow damage based on rounds loaded before firing, capped by current capacity.
Abyss Crystal Spine: When an arrow hits a block, it can fire a laser at an enemy within 12 blocks. The laser deals one damage and ignores the brief damage immunity after a hit.
Hunt Rift Mantises
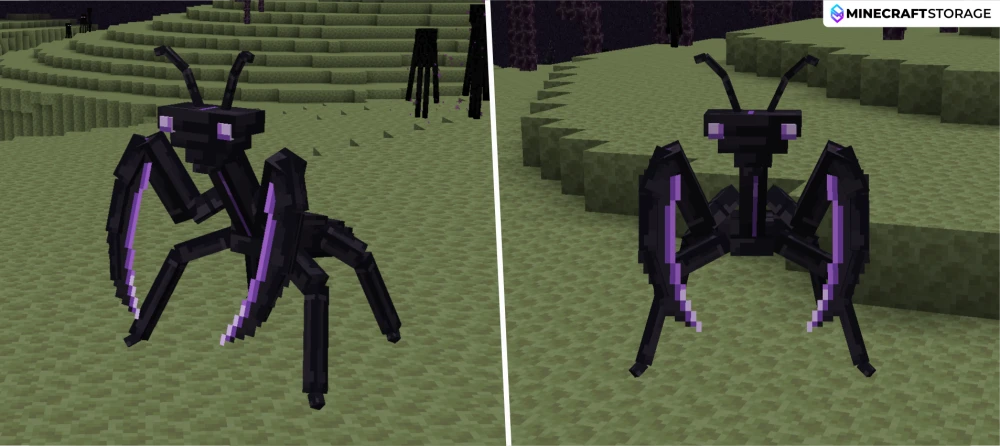
Rift Mantises inhabit End Highlands and End Midlands, giving you another progression path outside the two new biomes. Hunt them for the materials needed to summon the Rift Matriarch.
Rift Carapaces are a regular material drop.
Rift Sickles have a 25% base chance on a player kill, improved by Looting.
Expect several hunts if you do not receive a sickle immediately.
Their abilities include slashes, teleporting movement, and ranged rift attacks. Leave room to change direction.
Summon the Rift Matriarch
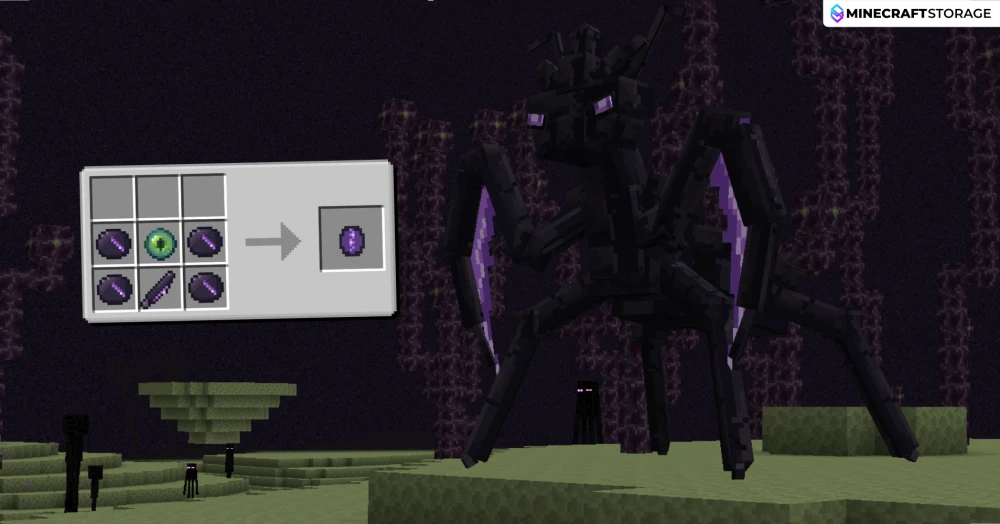
Craft a Rift Egg using four Rift Carapaces, one Eye of Ender, and one Rift Sickle. Place the Eye between two Carapaces in one row, then the Sickle between two more Carapaces directly below. Use the egg on a block in the End to summon the boss.
Choose a broad combat area away from the void.
Expect repeated slashes, teleporting attacks, blade storms, summoned minions, and hazardous field attacks.
Watch for its open core: incoming damage is doubled during that window.
Rewards include Rift Carapaces and Rift Sickles.
A player kill has a 20% chance to drop the Matriarch Scythe.
The Matriarch Scythe has a right-click blink/slash that moves you forward up to roughly six blocks and damages enemies along its path. Its cooldown is eight seconds at normal game speed. Aim toward safe ground before activating it.
Summon the Star Devourer Ray King
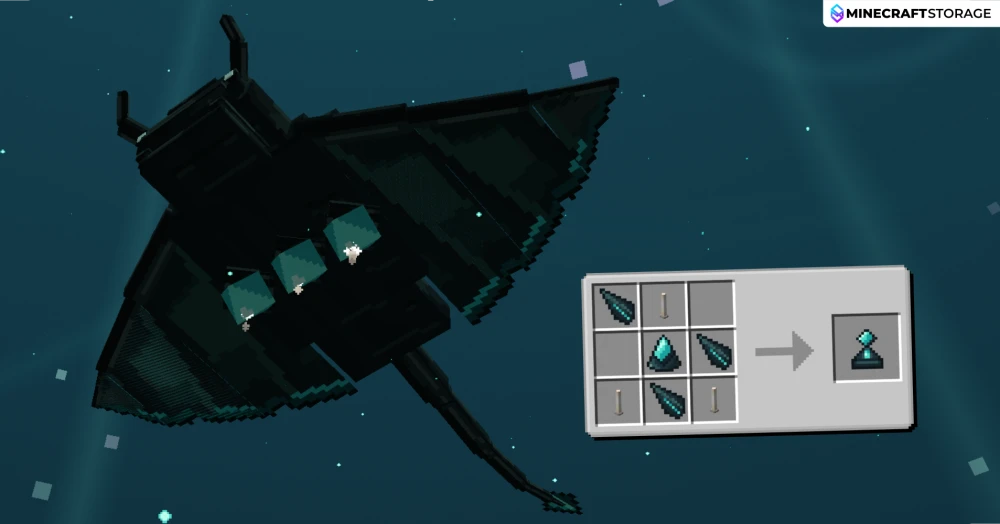
Craft a Star Beacon from three Ray Membranes, three End Rods, and one Void Core using the arrangement shown. Use it on a block in the End to summon the Star Devourer Ray King above the activation point.
Gather membranes and cores by hunting Void Rays in Tidelight Reef.
Choose an area with clear overhead space and plenty of ground for repositioning.
Prepare a ranged weapon before summoning; much of this fight takes place above you.
Break the Ray King’s Cores
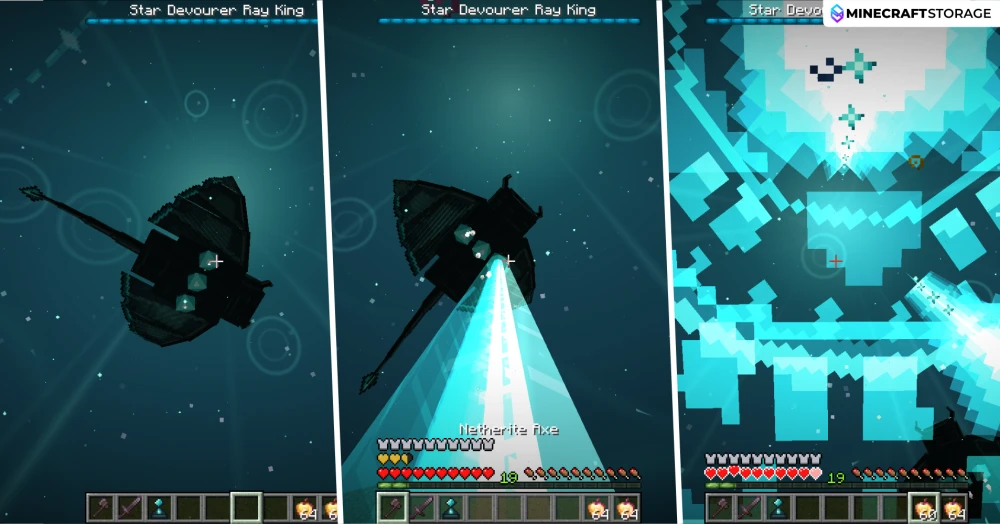
The Ray King combines diving attacks, beams, black holes, projectile rain, spinning attacks, and a devouring ability. Its three breakable cores create opportunities: destroying a core staggers the boss.
Concentrate on a core when you have a clear shot.
Clear summoned guards. While they remain alive, the boss reduces incoming projectile damage.
Use stagger windows to deal damage, then reposition for the next ability.
Its ordinary loot includes three to five Void Cores and eight to twelve Ray Membranes.
Fly with Ray King Wings
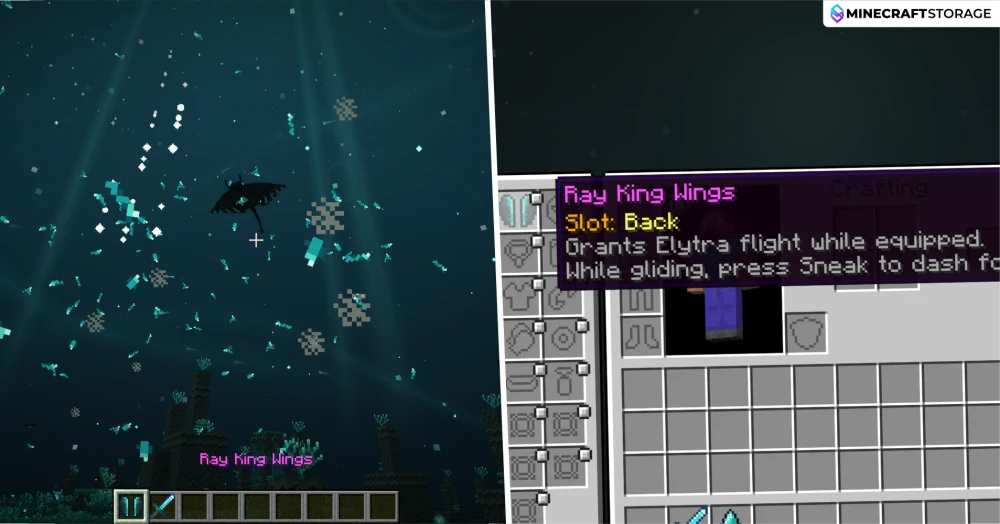
Eligible nearby players receive Ray King Wings on their first victory. Later victories give each eligible player a 20% chance of receiving another pair. Stay in the encounter area when the boss dies and collect the item that appears nearby.
Equip the Wings in the Back slot for Elytra-style flight.
While gliding, press Sneak to dash forward.
The dash has a three-second cooldown.
Suggested Progression for Your First Adventure
You can explore both biomes alongside one another. Use these goals to guide your first adventure, adjusting the order around the materials and encounters you find.
Discover both biomes and gather materials for your preferred ranged weapon.
Craft the Bow of Stars or Tidelight Crossbow, then collect its relics.
Hunt Rift Mantises and challenge the Rift Matriarch.
Defeat a Star Bearer for an Omen, then start Star Rain and hunt a Star Chaser.
Spend Star Core Embers on the chestplate or a Sky Eye Omen.
Obtain a Holy Star and challenge Skyrender for advanced bow relics.
Summon the Star Devourer Ray King and earn your first pair of Wings.
Conclusion
HP End Expansion gives you plenty to work toward beyond the Ender Dragon, from exploring Starwreck Wastes and Tidelight Reef to building relic combinations and challenging new bosses. Gather materials, strengthen your preferred weapon, and tackle each encounter when you feel prepared. With powerful equipment to earn and distinctive building blocks to bring home, every expedition can offer something useful.
Other end overhaul mods similar
Here are some similar mod to HP End Expansion
 mod
A newer, better End dimension with plenty of new content. Explore new biomes, find new structures, fight new mobs and conquer new bosses!
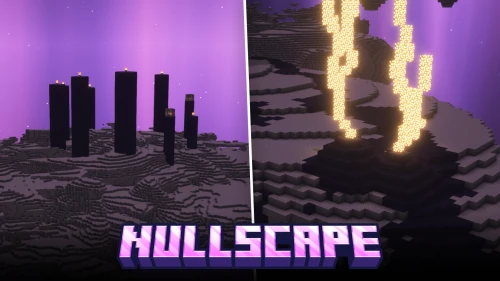 mod
A newer End dimension with increased height limit and more biome features.
 mod
Stellarity is a complete overhaul of The End dimension, transforming it from a mostly empty post-game area into a dense, lore-rich world full of new biomes, structures, enemies, weapons, and mechanics.
